Your child does not need a £200 plastic play kitchen. They need a patch of mud, a few old spoons, and this.
Most parents know mud play is good for kids. But the choices can feel annoying. You can buy an outdoor play kitchen for a lot of money, or you can follow a vague tutorial that skips the safety parts.
That is not helpful.
This guide shows you how to build a mud kitchen from pallets in a safe and simple way. You will learn how to find free pallets, check the HT vs MB stamp, build the frame, add a sink, sand the wood, seal it, and make it fun for your child.
You do not need a full workshop. You do not need fancy skills. You need safe wood, basic tools, and a clear plan.
By the end, you will know how to make a DIY mud kitchen that is strong, low cost, and ready for real outdoor play.
Why a Pallet Mud Kitchen Is Worth Building in 2026
A pre made mud kitchen can cost £80 to £400 or more. A DIY pallet mud kitchen can often cost under £15 to $30 if you already have scrap wood, old bowls, and basic screws at home.
That matters when kids may cover the whole thing in mud on day one.
The real value is the play. Mud kitchens help children scoop, pour, mix, lift, carry, and pretend. Those actions build hand strength, body control, creative thinking, and confidence.
Outdoor messy play also helps kids spend more time in nature. Research noted in the source links outdoor play with better motor skills, lower obesity risk, stronger thinking skills, and better immune function.
Here is the good news: this is a beginner level pallet project for kids. Some families have built one in a single afternoon. Thunderbird Disco Homestead shared a real build in March 2026 that cost under $15 using saved materials.
A pallet build also lets you choose the size. You can make it short for toddlers, taller for older kids, wide for two children, or small for a tiny garden.
Now let’s start with the part you cannot skip: safe pallets.
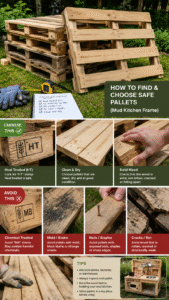
Step 1: How to Find and Choose Safe Pallets
Before you do anything else, read this section. Pallet safety matters more than the design.
You can often find free pallets at hardware stores, garden centres, furniture shops, local businesses, Facebook Marketplace, and Freecycle. Always ask before taking one. Some pallets are reused by companies and should not be taken.
For a children’s project, the stamp matters.
HT vs MB: What the Stamp Means
Look for a stamp on the side of the pallet. It may include letters, numbers, and country codes.
Safety Note: Never use a pallet stamped MB for a child’s mud kitchen.
Here is what the main marks mean:
- HT means heat treated. This is the best mark to find. The wood was heated, not treated with harmful fumigant chemicals.
- MB means Methyl Bromide. Do not use it. This chemical is toxic and older pallets may still have it.
- KD means kiln dried. This is usually safe.
- KD HT means kiln dried and heat treated. This is also a good sign.
- EPAL pallets are usually made to clear standards and are often safe when marked correctly.
- No stamp means you should be careful. For a children’s project, skip it unless you know where it came from.
The IPPC and ISPM 15 marking system exists for this exact reason. It helps people see how pallet wood was treated.
After you check the stamp, check the wood itself.
Look for:
- Strange smells
- Oil stains
- Dark patches
- Bright blue or red paint
- Mould
- Broken boards
- Large cracks
- Sharp splinters
- Exposed nails
- Signs of chemical spills
Bright coloured pallets often belong to rental companies. Blue pallets may belong to CHEP. Red pallets may belong to LPR. Leave them alone.
For most builds, two standard pallets are enough. Euro pallets are often easier because they come in a steady size of 1200mm by 800mm.
Once you have two safe pallets, you can gather the tools.
Step 2: Tools and Materials You’ll Need
Here is what you actually need. It is less than you think.
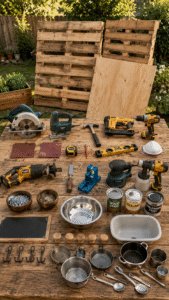
Basic Tools
- Circular saw or jigsaw
- Hammer or nail gun
- Screwdriver or drill
- Sandpaper in 80 grit and 120 grit
- Tape measure
- Pencil
- Spirit level
- Dust mask
Helpful Extras
- Reciprocating saw for taking pallets apart
- Chisel for loosening boards
- Pocket hole jig for cleaner joins
- Orbital sander to save time
- Paint sprayer for stain or sealant
Materials
- 2 safe pallets
- 1 plywood sheet for the countertop
- Screws or nails
- Exterior wood stain or sealant
- Metal or plastic bowl for the sink
- Hooks for utensils
- Knobs for pretend controls
- Chalkboard paint
- Old pots, pans, spoons, and tins
You can keep this cheap. A washing up bowl can become the sink. Old kitchen spoons can become the play tools. Scrap plywood can become a shelf.
House Digest lists a simple setup using two pallets, plywood, a nail gun, saw, bowl, and sandpaper. Thunderbird Disco Homestead shared a build made for under $15 with saved materials.
If you get the pallets for free, you are usually paying for plywood, screws, and finish. That often puts the cost around £15 to $30.
Now you are ready to build the frame.
Step 3: How to Build the Mud Kitchen Frame
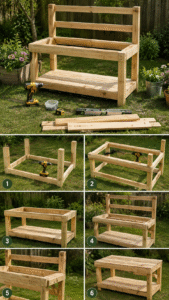
There are a few ways to build the frame. Here is the simplest one that works.
You will use one pallet as the back. Then you will cut the second pallet to make the side or base sections.
Build the Frame
- Choose the back pallet.
Pick the strongest pallet for the back wall. Stand it upright where the kitchen will sit. - Cut the second pallet.
Cut one pallet in half across the width. These two pieces can form the lower frame or side supports. - Set the height.
Think about your child’s height. The counter should sit around waist height. If it is too high, play becomes hard. - Attach the base pieces.
Screw or nail the cut pallet pieces to the upright pallet. Make sure the frame feels firm. - Check it with a spirit level.
Do this now. A crooked frame will not fix itself later. - Add legs if needed.
Use pressure treated 2×4 boards if the counter needs to sit higher. Cut each leg to the same length. - Test the frame.
Push it gently from the front and sides. It should not rock, lean, or tip.
Safety Note: No nail points should stick out anywhere. Check with your hand before your child gets near it.
The Wagner Group and Sari’s Garage build used a finished size of about 1.20m high and 1.60m wide. That gives you a useful guide, but you can adjust the size for your space.
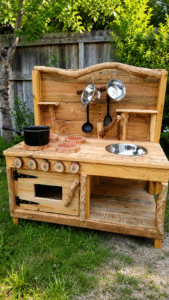
Cosy Direct shared a build made from two pallets over two afternoons by someone with no prior DIY experience. That is the goal here. Simple, strong, and useful.
Now that your frame is solid, it is time to add the part kids will use most.
Step 4: Add the Countertop and Sink
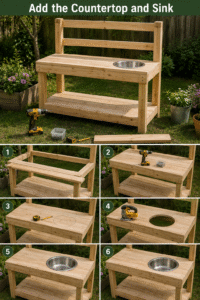
The countertop turns a pallet frame into a kitchen. The sink makes it feel real.
You do not need plumbing. A bowl is enough.
Fit the Countertop
- Measure the top of the frame.
Measure the width and depth where the counter will sit. - Cut the plywood.
Cut the plywood to fit the frame. If you do not have a saw, many DIY stores can cut it for a small fee. - Place the bowl upside down.
Put the bowl where you want the sink. - Trace the inner rim.
Use a pencil. Do not trace the outer rim, or the bowl may fall through. - Drill a starter hole.
Drill one hole inside the traced shape. This gives your jigsaw a starting point. - Cut the sink hole.
Use the jigsaw to cut around the line. - Test the bowl.
The bowl should sit in the hole and rest on its lip. - Fix the countertop.
Screw the plywood to the frame from below when possible.
If your bowl has raised handles, you may need to trim the raised parts so it sits flat. Take your time here. A neat fit makes the kitchen feel much better.
You can also add a pretend tap. A cheap brass tap or old garden tap can be screwed above the sink. It does not need to work.
The Lean Green Bean blog suggests adding exterior grade polyurethane to the countertop. This helps it handle mud and water.
Once the countertop is fitted, the next job is safety.
Step 5: Sand, Seal, and Finish It Safely
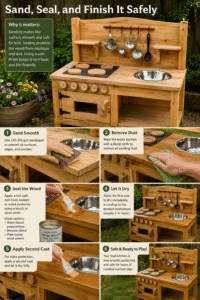
Do not skip this step. It matters more than the paint, the sink, or the cute extras.
Pallet wood can be rough. Children’s hands are soft. Splinters can ruin the whole project.
Start with 80 grit sandpaper. Sand every surface your child might touch. Then use 120 grit sandpaper to smooth it out.
Focus on:
- Counter edges
- Corners
- Shelf edges
- Pallet slats
- Nail holes
- Handle areas
- Any place hands will grip
Safety Note: Wear a dust mask while sanding. Pallet dust should not go into your lungs.
After sanding, add a finish made for outdoor wood. Look for a product that says it is safe once dry or safe once cured. Water based outdoor stains are often a good choice, but always read the label.
Let it dry fully before children use it. This part is boring, but it matters.
For decoration, use child safe paint. You can paint pretend stove rings, knobs, or a menu board. The Carpenter’s Daughter used old CDs as pretend hob burners, which is cheap and fun.
Cassie Fairy recommends painting parts before final assembly when possible, so the paint can dry well before children touch it.
Once the stain is dry and the paint is set, your mud kitchen is ready for the fun part.
Customisation Ideas That Kids Will Love
The basic build is done. Now make it theirs.
Small changes can make the kitchen feel special. You do not need to spend much.
Try these ideas:
- Add hooks for spoons and ladles
- Add a small shelf for cups and bowls
- Paint a chalkboard menu on the back
- Add a name sign
- Screw on old knobs as pretend cooker controls
- Use recycled CDs as hob burners
- Add pie tins, pans, cups, and plastic tubs
- Put a small water container above the sink
- Add a simple garden tap to the water container
- Hang a small curtain under the counter
The play props matter. A mud kitchen without spoons, bowls, and tins is just a wooden bench.
Check charity shops, car boot sales, thrift shops, and dollar stores for old kitchen tools. Avoid glass. Avoid sharp metal edges.
A fake working tap can be very exciting for kids. Use a small plastic water container or Jerry can on a shelf above the sink. Add a basic garden tap if you can.
Let your child help with painting, naming, and choosing the tools. That makes the kitchen feel like theirs.
Now let’s keep it in good shape.
How to Keep Your Pallet Mud Kitchen in Good Shape
A pallet mud kitchen is not fragile. But a little care helps it last for years.
Check it each spring before outdoor play starts.
Look for:
- New splinters
- Loose screws
- Soft wood
- Rot
- Wobbly legs
- Rusty nails
- Mould
- Peeling finish
Reapply outdoor stain or sealant once a year. Do it sooner if the wood looks dry, faded, or rough.
If you get heavy winter rain, cover the kitchen with a tarp. You can also move it into a shed or garage if you have space.
If mould appears on sealed wood, sand the area lightly and seal it again. If one board goes bad, replace that board. That is one of the best parts of pallet wood.
Families often use pallet mud kitchens for 3 to 5 years with basic care.
Build It, Then Let Them Make a Mess
A mud kitchen from pallets is a real weekend project. It is cheap, useful, and easier than it looks.
The main safety step is simple. Use safe pallets. Look for HT. Avoid MB. Sand every edge. Seal the wood before play.
After that, the rest is flexible. Add a bowl sink. Add hooks. Paint a menu board. Use old pots and spoons. Let your child help where they can.
This project does not need to be perfect. It needs to be safe, sturdy, and fun.
When it is done, share a photo on Instagram, Pinterest, or your local parent group. Other parents love seeing real builds they can copy.
Building a mud kitchen from pallets is one of the most rewarding afternoon projects you can do together, and the outdoor play that follows is the whole point.