Modern and distinctive home decor that you will find here
How to Build a Mud Kitchen for Kids (Under $100)
| Kaouthar
Your kid doesn’t need a $500 play set. They need a pile of mud, a few spoons, and a workspace to call their kitchen.
That’s it.
A mud kitchen is one of the best things you can build for a child. It’s cheap. It takes one weekend. And it will keep your kids outside and off screens for hours. But most parents don’t know where to start. What wood do you use? How tall should it be? What tools do you need?
This guide answers all of that. You’ll learn what a mud kitchen is, why it’s actually good for your kids (the science is real), what to buy, how to build it step by step, and how to stock it without spending much money.
Let’s get into it.
What Is a Mud Kitchen and Why Do Kids Love Them?
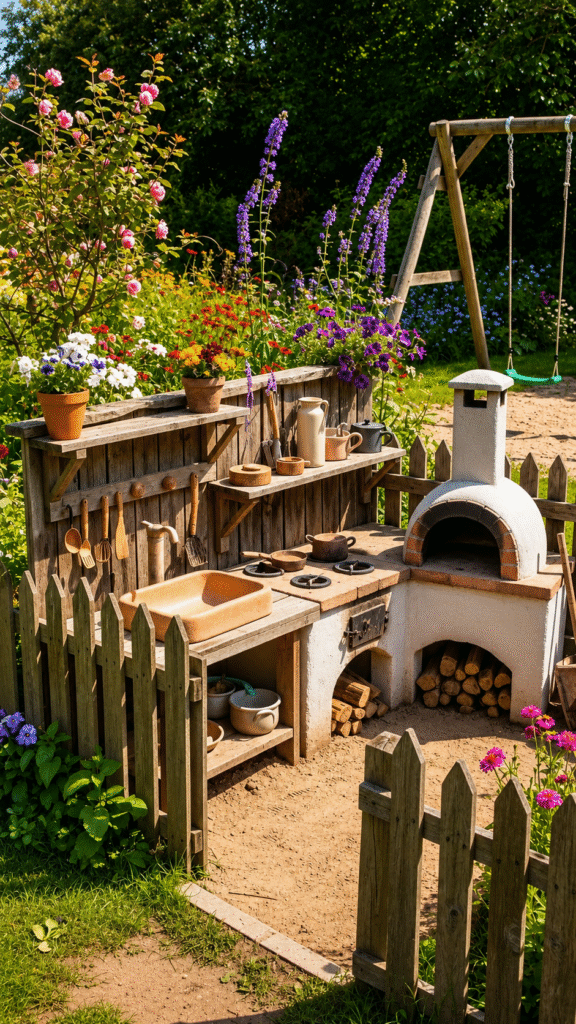
A mud kitchen is a child-height outdoor workbench. It’s usually made from wood. It has a “sink,” some shelving, and a flat surface where kids can mix mud, water, leaves, pebbles, and anything else they find in the yard.
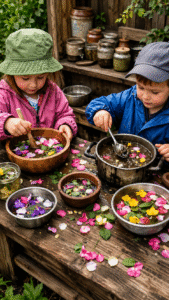
Kids use it to pretend-cook. They make “mud pies,” “rock soup,” “leaf stew,” and “petal potions.” They pour, stir, measure, and serve. It sounds simple. But watch a child play at one for ten minutes and you’ll understand why parents love them.
The best part? They work for almost any age. One family in Ohio built theirs when their youngest was 2 years old. Their oldest was 10 at the time. All of them still use it. That’s years of play from one weekend project.
It also doesn’t have to be fancy. A couple of big buckets, a tub of dirt, and some old spoons is technically a mud kitchen. You can start simple and build from there.
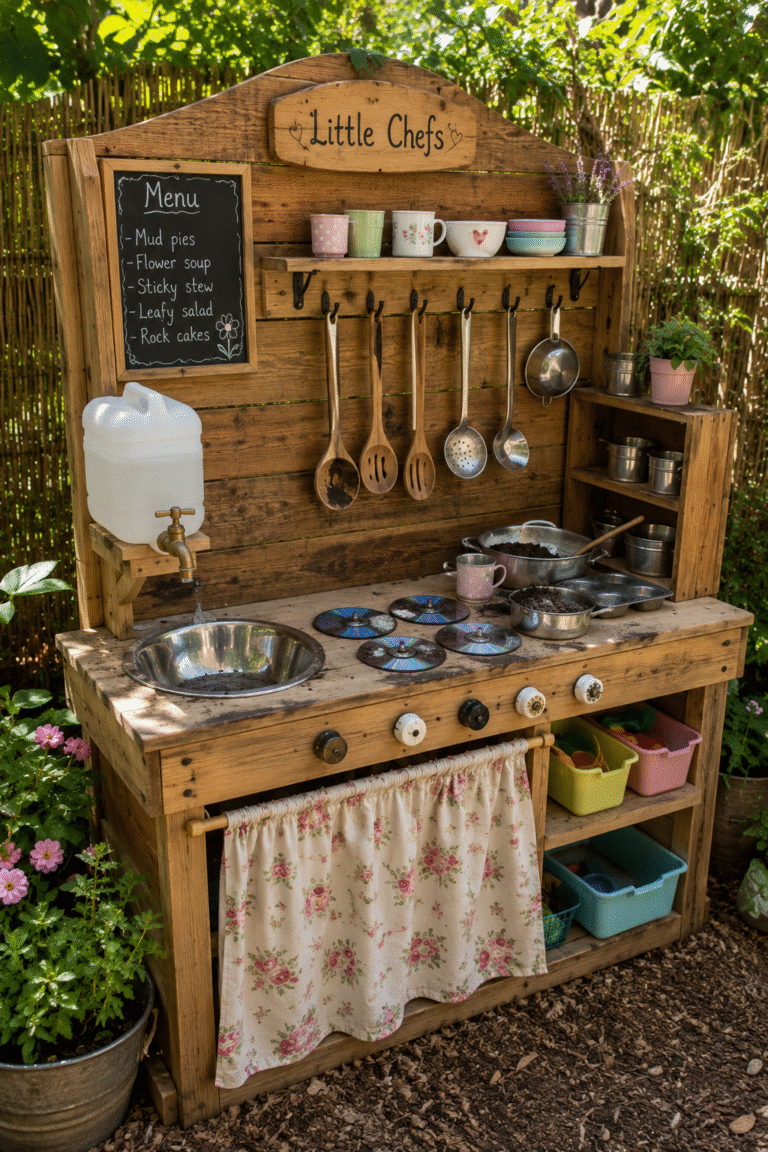
On the other end, you can build a full cedar structure with shelving, a sink, stove burners, and a chalkboard menu. The range is wide. That’s what makes it one of the most flexible outdoor projects you can do.
A simple thrift store setup with buckets and second-hand tools can cost less than $50. A solid cedar build with a sink runs under $100. And if you want running water, you can convert a potting bench for $200 to $400.
June 29 is International Mud Day, by the way. That’s a good deadline to build toward.
Why This Project Is Worth Your Weekend (The Science)
If “let them eat mud” sounds questionable, the research is surprisingly reassuring.
A 2025 scoping review published on NCBI looked at 40 studies from 2015 to 2025. Every single one of those studies found positive results from outdoor nature play across multiple areas of child development. That’s not a coincidence.
Their brains get stronger. Mud is a sensory experience. Kids feel the cool, squishy texture. They smell the earth. They hear it squish. All of that sensory input builds neural pathways in the brain. Those pathways help kids process information better and handle more complex tasks as they grow. This is backed by research from Community Playthings and the Minnesota Children’s Museum.
Their immune systems get a boost. Soil contains a bacteria called Mycobacterium vaccae. Researchers at Bristol University found that this bacteria activates neurons that produce serotonin. Serotonin is the brain chemical that makes you feel good. Studies also show that children raised on farms or in more outdoor environments have lower rates of allergies and asthma. The “hygiene hypothesis” says that overly clean environments may actually work against kids’ immune development.
They calm down. The act of squishing, patting, and molding mud gives kids deep pressure input. That kind of tactile stimulation is known to help regulate the nervous system. It’s the same reason some kids calm down when they get a tight hug. Nature Play WA identified this in their August 2025 research as one of 13 documented developmental benefits of mud play.
They practice math and science without knowing it. Measuring cups. Comparing amounts. Testing what happens when you add more water. Predicting whether the mud will hold its shape. That’s STEM. It’s also just a kid making mud soup.
They learn to work with others. Kids at a mud kitchen negotiate, share tools, take orders, and cooperate. These are real social skills being practiced in real time.
The American Academy of Pediatrics says outdoor active play is essential for preventing childhood obesity and supporting healthy development. A mud kitchen is one of the easiest ways to make that happen in your own backyard.
With the “why” covered, here’s exactly what you need.
What You’ll Need: Materials, Tools, and Real Budget Numbers
The good news is you have real options here depending on your budget and tool access.
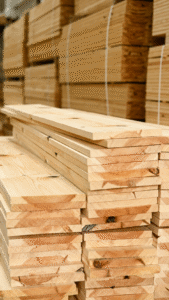
Cedar is the top choice. It resists rot naturally without any chemical treatment. It also smells good. Cedar 2x4s can be pricey, but cedar fence boards are cheap. Most builders mix both to keep costs down. Cedar runs about $6 to $10 per board foot.
Pressure-treated pine is the budget pick. It costs $2 to $8 per square foot and holds up well outdoors. It’s what most school mud kitchens are built from. One note: wash your hands after handling raw pressure-treated wood, especially for young children. Once you seal it with paint or stain, it’s safe for regular contact.
Pallets are free. Check behind grocery stores, garden centers, or hardware stores. They’re rougher to work with, but they cost nothing. Good option if this is your first build.
Materials List for a Standard Build (About 48 Inches Long)
5 pieces of 2×4 x 8ft lumber (cedar or pressure treated)
7 pieces of 1×6 x 8ft boards for the countertop and shelving
One box of 3-inch outdoor screws
One box of 1.25-inch deck screws
Outdoor stain and polyurethane sealer
Sandpaper in 120 grit and 220 grit
A mixing bowl or basin for the sink (embed it into the countertop)
Optional: a small utility sink, PVC circles for stove burners
Tools You’ll Need
Drill with driver bits
Miter saw, or just ask the hardware store to pre-cut your pieces
Jigsaw for the sink hole
Speed square to keep things square
Nail gun (optional, helpful for the backsplash)
Power sander or sandpaper
What It Will Cost
Pallet build: under $50
Standard cedar or pressure-treated build: $75 to $120. The Lean Green Bean built theirs in Ohio for just under $100 and it has lasted for years.
Premium potting bench with hose hookup and running water: $200 to $400
For comparison, pre-built mud kitchens sold online usually run $400 to $500. DIY saves you 75 to 80 percent.
Most of this can be sourced in a single hardware store trip. The lumber team at most Home Depot or Lowe’s locations will pre-cut pieces for you at no extra charge. Just bring your measurements.
How to Build a Mud Kitchen: 7 Steps
This is a manageable weekend afternoon project, especially if your lumber is pre-cut.
Step 1: Choose Your Location
Find a flat spot in your yard. Flat is important. The kitchen needs a stable base.
Pick somewhere with some shade. It protects your kids from the sun. It also keeps the wood from drying and cracking too fast.
Put it near a dirt area or garden bed so kids have easy access to mud. Avoid low spots where water pools after rain.
If you want multiple kids using it at once, plan for a bit of open space around it. A U-shape layout is used in school settings and fits 12 to 15 kids at a time. For a backyard, you’re probably building for 2 to 4 kids.
Step 2: Cut Your Lumber
Cut four legs. Counter height should be 22 to 24 inches for kids ages 3 to 8. Go up to 28 to 30 inches for older kids.
Cut the frame boards next. You need four long boards for the counter and shelf frames, plus six shorter crosspieces to connect them.
If you don’t have a saw, this is where you ask the hardware store for help. They cut it while you’re there. You bring it home ready to assemble.
Step 3: Build the Frame
Pre-drill holes before driving screws. This prevents the wood from splitting.
Build the counter frame first. It’s a rectangle. Then build the lower shelf frame the same way.
Attach the frames to the legs using 3-inch outdoor screws. Use your speed square at every joint. If the frame is not square, the whole structure will be wobbly.
Add legs to the inside corners of the frame. This adds stability.
Step 4: Add the Countertop and Bottom Shelf
Lay cedar fence boards across the counter frame. Space them evenly and attach with 1.25-inch deck screws.
Do the same for the bottom shelf.
Now sand everything. Start with 120 grit to smooth out rough spots. Finish with 220 grit for a soft surface. This step matters most for kids under 5. Splinters are no fun.
Step 5: Cut the Sink Hole
Place your mixing bowl or basin on the countertop. Trace around it with a pencil.
Draw a slightly smaller circle inside that line. This smaller circle is what you cut. You want the bowl to rest on the edges, not fall through.
Drill a starter hole inside the circle. Then insert your jigsaw and cut along the smaller circle.
Drop the basin in from above. If it wobbles, add blocking underneath to hold it steady.
If you want a real utility sink, use the template that comes with it to mark the cutout. Install it with the provided retaining clips. This Old House carpenter Nathan Gilbert uses this method and covers it in detail in his mud kitchen tutorial on YouTube.
Step 6: Add the Backsplash and Upper Shelf
Cut two vertical braces and attach them to the back of the structure.
Install cedar fence boards horizontally across those braces. Use a nail gun or screws.
Add an upper shelf. Put a small lip on the front edge so things don’t fall off. This shelf holds spice jars, containers, and supplies.
Screw in some hooks for hanging pots, pans, and ladles.
With your frame assembled, it’s time to seal the wood and make it weatherproof.
Step 7: Stain and Seal
Apply exterior stain. Pick whatever color you like. Then add a polyurethane topcoat for water resistance.
Give it 24 hours to dry before your kids use it.
Plan to re-stain every two years. If you’re in a cold climate and won’t use it all winter, throw a tarp over it. That alone will add years to its life.
Once it’s sealed and dry, the fun part begins.
Optional Add-Ons Worth Adding
Stove burners: Cut PVC circles and glue them to the cooktop. Draw knobs with a Sharpie. Parents report this is a massive hit with kids.
Chalkboard side panel: Kids write their menu. Great for the “restaurant” version of mud kitchen play.
Labeled jars: Grab small glass jars or bottles and stick chalkboard labels on them. Fill with rice, beans, dried herbs, or yard finds.
Hooks on the sides: For pots, pans, and ladles.
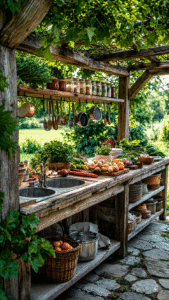
Potting bench conversion: Buy a wooden potting bench and attach a hose connection for running water. Great option if you want to skip building from scratch.
What to Put in Your Mud Kitchen
You don’t need to spend much to stock a great mud kitchen.
Use real kitchen tools, not plastic toy ones. Real muffin tins, metal pots, cookie trays, and colanders hold up in the mud. Plastic toy kitchen sets break fast outdoors. Go metal when you can.
Shop second-hand first. Thrift stores, dollar stores, and garage sales are perfect for this. One parent found a big pot, a tea kettle, and a set of metal bowls at her local thrift store for a few dollars. One rule she set: nothing breakable. Metal only.
Stock natural ingredients. Set up a small section of garden bed or a separate sandbox tub just for mud-making. Add sand, pebbles, pinecones, leaves, dried herbs, and flower petals. These become the “ingredients” in every recipe your kids invent.
Add pouring and measuring tools. Big pitchers, funnels, strainers, and measuring cups all get a lot of use. Kids love pouring and measuring.
Plan for easy cleanup. Put open laundry hampers on the bottom shelf. At the end of play, kids dump everything muddy into the hampers and hose off the surface. Takes two minutes. This system is used in school mud kitchens that serve over a dozen kids at a time and it works.
Fun extras to add over time: Labeled “spice jars” filled with yard materials, a small chalkboard menu board, and a toy cash register for the restaurant version of play. A book called “The Muddy Chef” by Mother Natured gives kids real mud kitchen recipes to follow. Kids love having something to follow.
Let your kids help stock it. Choosing their own ingredients is half the fun.
Mud kitchens are genuinely low-risk. A few simple habits keep things safe and make the build last.
For toddlers under 3: Use plastic pots and pans instead of metal. A dropped pot won’t hurt little feet as much. Round off any sharp corners with sandpaper before the first play session. Keep an eye on standing water. Don’t leave a full sink basin sitting for several days in summer. It becomes a mosquito breeding spot.
Water management: Refill the sink basin from a hose as needed rather than leaving it permanently full. Schools that use mud kitchens often limit water to three basin-fills per session. This also teaches kids about not wasting water.
Year-round use: You can use a mud kitchen in every season. Snow works as an ingredient too. In winter, cover the structure with a tarp if it sits unused for long stretches.
Wood care: If you used pressure-treated lumber, have kids wash their hands after touching the raw wood before it’s sealed. Once you’ve stained and sealed the surface, it’s safe for contact. Cedar doesn’t need chemical treatment at all. Re-seal the whole structure every one to two years to prevent cracking and rot.
Basic mud hygiene: Have kids wash their hands after play. Avoid filling the mud area with compost or manure-rich soil, which can contain harmful bacteria. Regular garden soil or topsoil is fine.
Now Go Build It
A mud kitchen is one of the most affordable, developmentally rich outdoor projects you can build for your kids.
It costs $50 to $120 in materials. It takes one weekend afternoon. And it will last for years if you seal it properly.
The research backs it. The science is real. Mud play builds stronger immune systems, healthier brains, calmer kids, and better social skills. All from dirt, water, and a wooden workbench.
You don’t need carpentry experience. You don’t need a full workshop. Pre-cut lumber, a drill, and a free afternoon is enough to get it done.
Grab a pencil and sketch out your space this week. Pick your build type: pallet, cedar, or potting bench. Get your lumber list together. Then go to the hardware store.
Your kids will be stirring up their first batch of mud soup before you know it.
Building a mud kitchen for your kids is one of those rare projects that costs very little and gives back endlessly.