Modern and distinctive home decor that you will find here
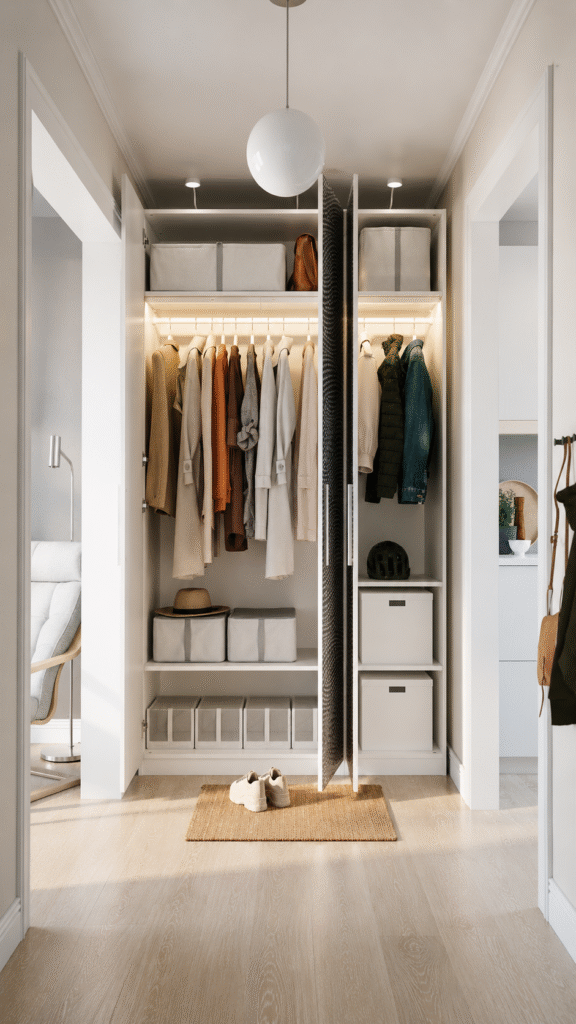
IKEA Wardrobe Built In Hacks That Look Custom
| Kaouthar
Your IKEA wardrobe can look built in, but only if you plan the frame, trim, doors, and gaps before you start cutting wood.
That is where many people get stuck.
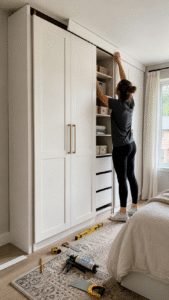
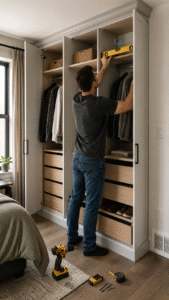
You buy the IKEA PAX system because it is flexible and budget friendly. You bring it home. You build it. Then you see the problem.
There are gaps at the top. There are gaps at the sides. The base does not match the room. The wardrobe works, but it still looks like furniture sitting against a wall.
This guide will help you fix that.
You will learn how to plan your layout, measure the space, fill gaps, add trim, upgrade the doors, and make the inside easier to use. You will also learn what mistakes to avoid, because some IKEA wardrobe built in hacks look simple online but cause problems in real rooms.
The goal is simple.
You want a built in wardrobe IKEA PAX project that looks clean, works well, and feels right for your home.
Why IKEA PAX Works Well for Built In Wardrobe Hacks
IKEA PAX is one of the best starting points for a built in wardrobe look because it already gives you the storage frame.
You do not need to build the whole closet from scratch.
That saves time. It also makes the project easier for a normal DIY person.
IKEA says the PAX system comes in several heights, widths, and finishes. You can also combine different parts to build the wardrobe you need. That matters because your space may need more hanging space, more drawers, or more shelves.
The IKEA PAX planner also helps you test ideas before you buy. You can plan the layout online and see how the parts fit together. This is helpful because a bad layout can waste money fast.
But here is the honest part.
PAX does not look built in by itself.
A true built in look comes from the finish work around it. You need trim, filler panels, baseboards, careful measuring, and safe wall anchoring.
Young House Love explains that the main trick is using trim or molding to create a floor to ceiling look. They also note that PAX comes in 79 inch and 93 inch heights, so an 8 foot ceiling often leaves a small top gap to fill.
This is why an IKEA PAX built in hack works best when you plan both the storage and the finish.
Best for:
• Bedrooms • Guest rooms • Small walk in closets • Hallway storage • Office storage walls
Not best for:
• Wet rooms • Damp basements • Walls with blocked vents • Rooms where you cannot anchor furniture • Spaces with very uneven floors unless you can level the base
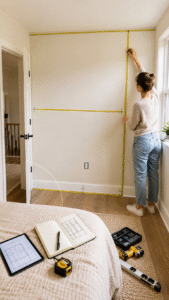
Good ikea wardrobe built in hacks start with measuring, not shopping.
This is the step people want to skip. Do not skip it.
A wall can look straight and still be off by half an inch. A ceiling can look level and still drop from one side to the other. A floor can slope just enough to make your wardrobe doors look wrong.
Measure your space in more than one place.
Check the width at the floor, middle, and ceiling. Check the height on the left, center, and right. Check the depth from the back wall to the front edge where the wardrobe will sit.
Also check anything that could get in the way.
That means outlets, light switches, vents, door trim, baseboards, window trim, and ceiling lights.
You also need to think about door swing. A wardrobe can fit the wall but still fail if the doors hit the bed, nightstand, or room door.
Use this quick checklist before you buy:
• Room width at floor level • Room width at the middle • Room width near the ceiling • Ceiling height on the left side • Ceiling height in the center • Ceiling height on the right side • Wall depth • Baseboard thickness • Outlet locations • Light switch locations • Heating vents • Door casing • Floor slope • Space for wardrobe doors to open
Young House Love gives a simple example. If you have 96 inch ceilings and use a 93 inch PAX frame, you may have about a 3 inch gap at the top before trim. That gap is normal. You just need to plan how to cover it.
After you measure, draw the wall on paper.
Then use the IKEA PAX planner. Test the layout before you spend money.
Do you need space for dresses and coats? Do you need drawers for folded clothes? Do you need shoe shelves? Do you need hidden storage for bags, bedding, or kids items?
The right PAX wardrobe layout depends on your real life.
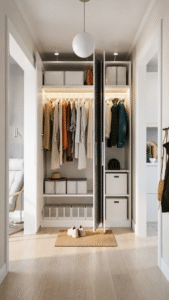
A wall to wall wardrobe works well in a bedroom. It gives you a clean storage wall and makes the room feel more planned.
An alcove wardrobe works well when you have a recessed space. This is one of the easiest places to make PAX look built in because the walls already frame the wardrobe.
A closet insert works well if you want to replace a basic rod and shelf with better storage.
A walk in closet wall works well if you have enough space to stand back and open drawers.
A mudroom style wardrobe can hold coats, shoes, bags, and school items.
An office storage wall can hide printers, files, craft supplies, or extra home items.
For couples, split the wardrobe into two clear zones. Each person gets their own side. This avoids clutter later.
For small bedrooms, use more drawers and fewer open shelves. Drawers hide mess better.
For kids, keep some storage low. They are more likely to use it.
For renters, keep changes as simple as possible. Ask before adding trim, paint, or anchors.
For resale, choose simple doors and simple trim. A clean look ages better than a trendy one.
IKEA says PAX can be planned with different components, which makes it useful for many storage needs.
The layout is the part you use every day.
Do not copy a pretty photo if it does not fit your clothes.
That is one reason a base can make your IKEA wardrobe look more fitted. It lifts the frames slightly and lets you run baseboard across the front. This helps the wardrobe feel like part of the room.
A base also helps if your floor is not level.
But the base must be strong, square, and level. If the base is wrong, the wardrobe above it will be wrong too.
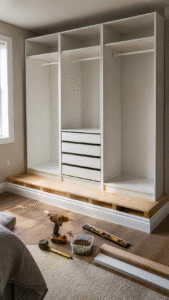
A simple base process looks like this:
Build a wood platform that fits the wardrobe footprint.
Check it with a level.
Shim it if the floor is uneven.
Secure it in a safe way for your room.
Place the PAX frames on top.
Attach the frames to the wall as IKEA instructs.
Add baseboard across the front.
Angela Marie Made’s PAX built in tutorial lists common supplies such as framing lumber, furring boards, baseboard, crown molding, screws, brad nails, wood glue, paintable caulk, wood filler, primer, paint, a stud finder, a drill, a miter saw, and a brad nailer.
That list tells you something important.
The wardrobe itself is just the start.
The built in look comes from the woodwork around it.
If you are new to DIY, keep the base simple. Do not build hidden drawers or special storage into the base on your first try. Start with a level platform and clean baseboard.
That alone can make a big difference.
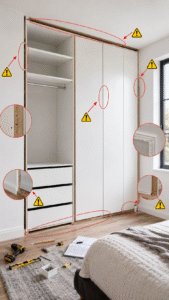
Fill Side and Ceiling Gaps for a True Built In Look
Gaps are the biggest reason an IKEA wardrobe looks unfinished.
You may have a gap at the ceiling. You may have a gap on one side. You may have a wall that is not straight. You may have a baseboard that stops the wardrobe from sitting tight to the wall.
This is normal.
The fix is to use filler panels, trim, and molding.
A small top gap can often be covered with crown molding or a simple top trim board.
A larger top gap may need a framed extension box above the wardrobe.
A small side gap can be covered with scribe trim.
A wider side gap usually needs a filler panel.
An uneven wall needs a filler panel that is cut to fit the wall shape.
A visible bottom gap can be covered with baseboard or plinth trim.
Young House Love says trim or molding is the main trick for making PAX look floor to ceiling.
Erin Cola also recommends details like arches, fluted trim, ceiling extensions, and hardware to help PAX look more custom.
Here is a simple gap guide:
Problem
Best fix
Small top gap
Crown molding
Large top gap
Framed top box
Side gap under 1 inch
Scribe trim
Side gap over 2 inches
Filler panel
Uneven wall
Oversized filler cut to fit
Bottom gap
Baseboard or plinth
Paint or finish the filler pieces so they match the wardrobe.
This is the detail that makes the whole project feel planned.
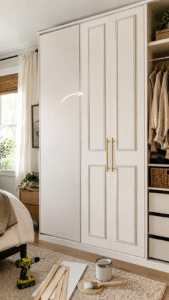
Upgrade the Doors So It Does Not Look Like Flat Pack Furniture
So if you want your IKEA wardrobe hack to look custom, the doors matter.
You can keep the IKEA doors and upgrade the hardware. This is the easiest choice.
You can add trim to plain doors to create a shaker style look.
You can add fluted panels for texture.
You can use cane webbing if you want a softer look.
You can use wood veneer for a warmer style.
You can also build custom MDF doors, but that takes more skill.
If you paint IKEA doors, prep is everything.
Clean the surface first. Lightly sand glossy areas. Use a bonding primer. Then use strong cabinet paint.
Do not paint straight onto a slick surface and expect it to last.
That is how peeling starts.
For a beginner project, change the handles first. New handles can make plain doors look much better.
For a medium project, add slim trim to the doors and paint them.
For an advanced project, build new doors or use custom fronts.
Erin Cola’s 2026 PAX guide includes upgrades like fluted drawer fronts and designer hardware. These are the types of details that make PAX feel less basic.
Use baseboard along the bottom. Use side trim where the wardrobe meets the wall. Use crown molding or top trim near the ceiling. Use door trim or panel molding if you want more detail on the fronts.
But use the right product in the right place.
Wood filler is for nail holes and small seams in wood.
Paintable caulk is for small gaps where trim meets the wall.
Spackle is for small wall damage.
Primer is for raw MDF or glossy surfaces.
Cabinet paint is for doors, trim, and visible parts that need to hold up.
Angela Marie Made’s material list includes crown molding, baseboard, paintable caulk, wood filler, primer, and paint for a PAX built in project.
This is why the finish work can take longer than the assembly.
The wardrobe may go together in a day.
The built in look may take more time.
Go slow here.
Caulk cleanly. Fill holes. Sand rough spots. Paint in thin coats.
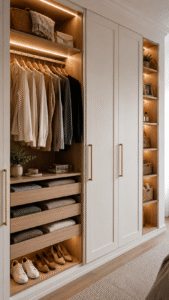
A pretty wardrobe still fails if it does not store your real stuff.
So plan the inside with care.
Start with what you own most.
If you own dresses, coats, or button shirts, use more hanging space.
If you own gym clothes, folded tops, socks, and kids clothes, use more drawers.
If you own shoes, bags, baskets, or folded sweaters, use more shelves.
If you get dressed in a hurry, add one open drop zone shelf. This gives you a place for daily items.
PAX works well because you can combine interiors like drawers, shelves, rods, trays, and organizers. IKEA describes PAX as a system you can combine to build your ideal wardrobe.
Do not fill every inch with shelves just because it looks neat in the planner.
Real clothes need breathing room.
Also think about height.
Put daily items at chest height.
Put heavy items lower.
Put seasonal items higher.
Keep the things you use most in the easiest places.
A built in wardrobe should make your mornings easier.
A built in look is not worth it if the wardrobe is not safe.
Start with wall anchoring.
IKEA says clothing storage furniture must be securely attached to the wall to help prevent tip over accidents. IKEA also says wall attachment hardware is provided with some products, and the best way to help prevent furniture tip over is to anchor furniture to the wall.
Use hardware that matches your wall type.
Drywall, plaster, brick, and concrete need different anchors.
If you are not sure, ask at a hardware store or hire a pro.
Also check vents and outlets.
Do not cover a heating vent.
Do not trap an outlet where you cannot reach it.
Do not let trim block hinges or drawers.
Before you load the wardrobe, check this list:
• Frames are level • Frames are anchored • Doors open smoothly • Drawers slide freely • Trim does not block hinges • No vent is blocked • No outlet is hidden forever • Lights and wires are safe • Heavy items are stored low • Children cannot climb the storage easily
This section may feel boring.
But it protects your home.
And here’s why that matters.
A wardrobe full of clothes is heavy.
Treat it like a real built in project, not just a style project.
Fix it by measuring first. Use the PAX planner after you know your real room size.
Mistake 2: Forgetting the ceiling gap
The wardrobe may be shorter than your ceiling.
That gap will show.
Fix it with crown molding, a top trim board, or a framed extension.
Mistake 3: Ignoring baseboards
Baseboards can stop the wardrobe from sitting close to the wall.
Fix it by planning filler pieces or removing and replacing baseboard where needed.
Mistake 4: Skipping the wall studs
If you do not know where the studs are, anchoring gets harder.
Fix it by using a stud finder before you build.
Mistake 5: Painting without primer
Paint can peel if the surface is slick.
Fix it by cleaning, sanding lightly, priming, and then painting.
Mistake 6: Using trim that blocks doors
Some trim looks good until the doors open.
Fix it by testing door swing before nailing trim in place.
Mistake 7: Not leveling the base
An uneven base makes doors and drawers act strange.
Fix it before the wardrobe goes on top.
Mistake 8: Planning for looks only
A wardrobe can look great and still be annoying to use.
Fix it by planning around your clothes, shoes, and daily habits.
Mistake 9: Hiding outlets or vents
This can create problems later.
Fix it by marking them during planning.
Mistake 10: Skipping safety
Anchoring matters.
Fix it by following IKEA instructions and using the right hardware for your wall.
Budget Plan and Materials List
The cost of an IKEA wardrobe built in project can change a lot.
It depends on your country, room size, doors, trim, paint, lights, and labor.
So do not trust one random price online as the rule.
Build your own budget.
Include these items:
• IKEA PAX frames • PAX doors • KOMPLEMENT interiors • Drawers • Shelves • Hanging rods • Wood for the base • Filler panels • Side trim • Crown molding or top trim • Baseboard • Screws • Wall anchors • Wood filler • Paintable caulk • Primer • Cabinet paint • Handles • Lighting • Delivery • Tools you do not own • Installer help if needed
IKEA’s PAX page says the system has planning tools and related services, which can help if you do not want to plan everything alone.
Use budget levels instead of fake average prices.
Budget level
What it includes
Basic look
PAX frames, simple doors, side filler, baseboard
Better look
Painted doors, crown molding, upgraded handles
High end look
Custom doors, fluted trim, veneer, lighting, pro help
Before publishing your final article, check live prices from IKEA in your reader’s country.
Prices change.
Stock changes too.
10 IKEA Wardrobe Built In Hacks to Try in 2026
Pick the idea that fits your room and skill level.
Do not pick the hardest project just because it looks best online.
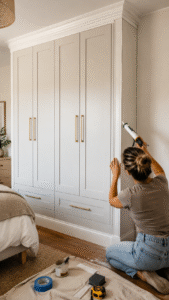
1. Wall to wall PAX with crown molding
Difficulty: Beginner to weekend DIY
This is the classic built in look.
Place PAX frames across one wall. Fill the side gaps. Add top trim or crown molding. Add baseboard across the bottom.
Best for bedrooms and guest rooms.
2. Alcove wardrobe with side filler panels
Difficulty: Beginner
An alcove already gives you a built in shape.
Use filler panels on both sides so the wardrobe fits the wall cleanly.
Best for older homes with recessed wall spaces.
3. PAX with fluted drawer fronts
Difficulty: Weekend DIY
Add fluted trim to drawer fronts for texture.
This works well if you want a designer look without changing the whole wardrobe.
Best for bedrooms and dressing rooms.
4. PAX with custom MDF shaker doors
Difficulty: Intermediate
Build or upgrade doors with MDF trim.
This gives a classic cabinet look.
Best for homes with simple trim and paneled doors.
5. PAX with arched trim detail
Difficulty: Intermediate
Add an arch above open shelving or around a center section.
This makes the wardrobe feel more custom.
Best for a feature wall.
6. PAX with hidden base storage
Difficulty: Advanced
Use the base area for low storage drawers.
This is harder because the base must stay strong and level.
Best for small rooms where every inch matters.
7. PAX walk in closet wall
Difficulty: Weekend DIY to intermediate
Use PAX along one or two walls in a walk in closet.
Mix hanging space, drawers, and shelves.
Best for people who need organized clothes storage.
8. PAX mudroom storage
Difficulty: Intermediate
Use PAX frames for coats, shoes, bags, and bins.
Add hooks and lower storage for kids.
Best for busy families.
9. PAX office storage cabinets
Difficulty: Weekend DIY
Use PAX to hide office supplies, files, craft items, or printers.
Add doors to keep the room calm.
Best for home offices and multipurpose rooms.
10. PAX with wood veneer doors
Difficulty: Advanced
Use wood veneer or custom wood fronts for a warmer look.
This can look high end, but it needs careful work.
Best for modern rooms and calm neutral spaces.
Final Thoughts
The best IKEA wardrobe built in hacks are not about one magic trick.
They come from good planning.
Measure first. Choose the right PAX layout. Build a level base. Fill the side and ceiling gaps. Add trim. Upgrade the doors if your budget allows. Then check safety before you load it with clothes.
Start with your room, not someone else’s photo.
Use the IKEA PAX planner before you buy. Check your wall, ceiling, floor, vents, and outlets. Then choose the hack that fits your budget and skill level.
The best ikea wardrobe built in hacks are the ones that fit your room, your clothes, and your daily life.