
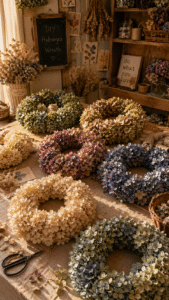
The dried hydrangea wreath trend is sweeping through Pinterest like a breath of fresh air. If you’ve been scrolling through your feed and admiring those beautiful, rustic wreaths, you’re not alone. The joy of creating a unique piece for your home, one that reflects your style and adds a touch of nature, is truly irresistible. Whether you’re looking to elevate your entryway or spruce up a seasonal decor, making a dried hydrangea wreath can bring a sense of warmth and charm to your space.
If you’re someone who loves DIY projects or simply wants to enhance your home decor, this guide is for you. We’ll walk through the process step-by-step, making it easy for anyone to join in on the fun. You’ll learn how to choose the right hydrangeas, gather your supplies, and assemble your wreath. By the end, you’ll have a stunning piece that not only showcases your handiwork but also invites the beauty of nature into your home.
Get ready to dive into a world of creativity! This post is packed with tips and tricks to help you create a dried hydrangea wreath that will surely impress. You’ll also discover how to care for your creation, incorporate it into your decor, and even share it online for others to admire. Let’s get started on this delightful DIY journey!
Key Takeaways
– Choosing the Right Dried Hydrangea: Learn how to select the best hydrangeas for your wreath, considering color, size, and texture to match your home’s aesthetic.
– Gathering Your Supplies: Find out what materials you need for your DIY project, ensuring you have everything on hand for a smooth crafting experience.
– Creating Your Base: Discover how to create a sturdy wreath base that can support the dried hydrangeas and hold them in place beautifully.
– Finishing Touches and Embellishments: Get creative with additional decorations to personalize your wreath, from ribbons to seasonal accents that make it uniquely yours.
– Caring for Your Dried Hydrangea Wreath: Learn simple care tips to keep your wreath looking fresh and beautiful for months to come, ensuring it remains a focal point in your decor.
Contents
- Choosing the Right Dried Hydrangea
- Gathering Your Supplies
- Creating Your Base
- Arranging the Hydrangeas
- Finishing Touches and Embellishments
- Caring for Your Dried Hydrangea Wreath
- Incorporating Wreaths into Your Home Decor
- Sharing Your Creation Online
Choosing the Right Dried Hydrangea
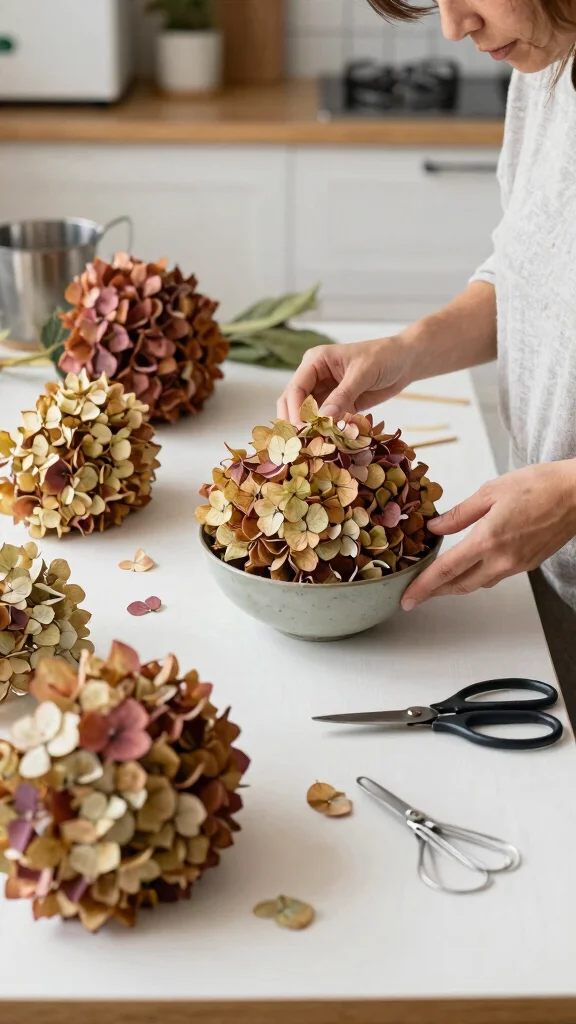
To craft a breathtaking dried hydrangea wreath, start by selecting the ideal blooms. Dried hydrangeas are cherished for their stunning, muted hues that truly shine when preserved, offering a combination of elegance and warmth. Look for a mix of colors—rich greens, deep blues, and soft pinks—to create a visually rich wreath that captures attention and evokes a sense of tranquility. Each bloom adds character, making your wreath unique and inviting.
Ensure the hydrangeas are completely dried before you begin your project. You can buy them pre-dried or dry fresh flowers yourself by hanging them upside down in a cool, dark space, which typically takes two to three weeks. Handle the dried flowers gently, as they can become fragile during this process.
Consider these tips when choosing your dried hydrangeas:
– Select blooms that enhance your home’s color scheme.
– Mix various shades for added vibrancy.
– Ensure they are fully dried to prevent mold.
Taking the time to choose the right hydrangeas lays a solid foundation for a stunning wreath.
Gathering Your Supplies

Once you’ve picked your dried hydrangeas, it’s time to gather the supplies for this enjoyable DIY project! A few essential items will help ensure a smooth crafting experience. Here’s a quick list of what you’ll need:
– A sturdy wire wreath frame, ideally between 12 to 18 inches
– Floral wire for securing the flowers
– Hot glue gun and glue sticks for extra stability
– Dried hydrangeas in assorted colors
– Optional: twine, ribbon, or seasonal decorations for embellishment.
Having all your supplies organized will make the crafting process more enjoyable. Layout your materials before you start and consider sketching a design to guide your placements. A comfortable workspace fosters creativity and makes the project flow better.
For a personalized touch, blend in other dried flowers or sprigs of eucalyptus to complement your hydrangeas.
Creating Your Base

Now that you have your supplies ready, it’s time to create the wreath base! Begin by taking your wire frame and using floral wire to attach larger foliage or base layers. This foundational layer gives your wreath a fuller appearance and secures the hydrangeas.
Choose larger leaves or greenery to establish this base, wrapping them securely around the frame. This layer not only supports the hydrangeas but also adds desirable texture. You might consider layering with darker greens at the back and lighter ones in front for depth.
Once your base is prepared, it’s time for the hydrangeas! Secure their stems into the base and use the hot glue gun to reinforce any loose areas. Alternating colors and sizes will create an eye-catching design.
A valuable tip is to step back occasionally to evaluate your wreath, ensuring a balanced and appealing arrangement.
Arranging the Hydrangeas
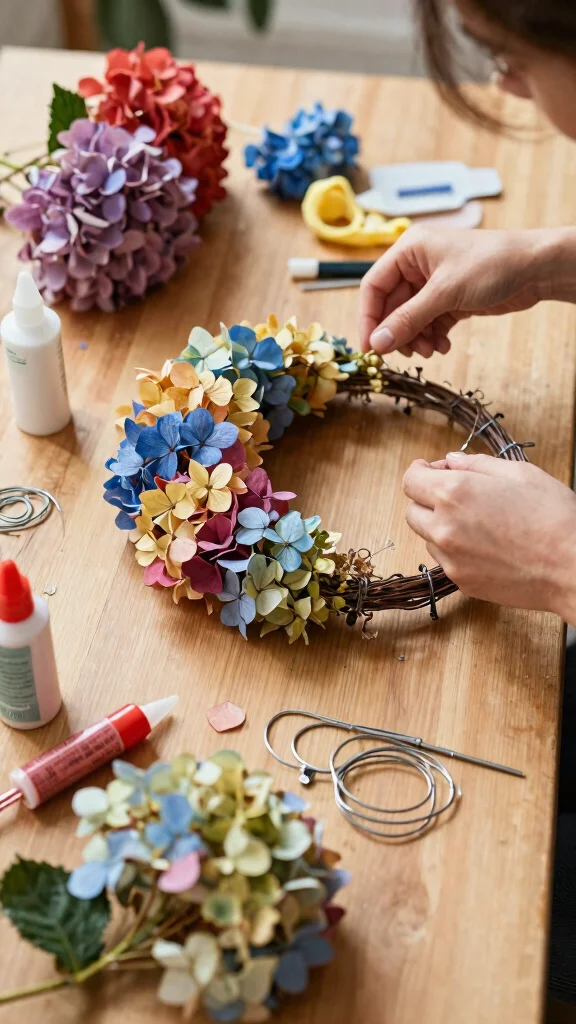
With your base ready, it’s time to arrange the dried hydrangeas! Start by placing them around the wreath, experimenting with different placements before committing to glueing. Alternating colors, sizes, and shapes will create visual interest and depth.
Follow these steps for arranging your hydrangeas:
– Pick a focal point for your wreath’s most vibrant area.
– Layer and stagger blooms, placing larger ones first.
– Secure with floral wire for stability before glueing.
– Glue generously once you’re satisfied with the layout.
Don’t hesitate to get creative—mix in other dried flowers or twigs for added texture. The beauty of a DIY wreath lies in making it truly your own!
You might also like


How To Choose The Right Dried Hydrangea
Choosing the right dried hydrangea for your wreath can make all the difference in your DIY project. These stunning flowers come in various colors, sizes, and textures. Here’s what to consider when picking the perfect blooms for your dried hydrangea wreath.
1. Color
Think about the color scheme of your home decor. Dried hydrangeas come in shades like soft pink, blue, white, and even deep burgundy. Choose a color that either complements your existing decor or stands out as a statement piece. Mixing different colors can add depth and interest to your wreath.
2. Size
Hydrangea blooms can vary significantly in size. Larger flowers often create a bold statement, while smaller ones can add texture without overwhelming the design. If you want a full-bodied look, opt for larger blooms mixed with smaller ones for balance. Aim for a variety of sizes to create visual interest.
3. Freshness
Make sure the dried hydrangeas you choose are in good condition. Check for any signs of mold or discoloration. The flowers should feel lightweight and firm, not brittle or crumbly. If buying from a store, inspect them closely. If you’re sourcing them yourself, pick blooms that are fully dried and vibrant.
4. Texture
The texture of the hydrangeas matters too. Some may have a more delicate, papery feel, while others might be thicker and more robust. Mixing different textures can enhance the overall look of your wreath. Consider combining smooth hydrangeas with rougher elements like twigs or dried grasses.
5. Budget
Prices for dried hydrangeas can vary. Set a budget before shopping. You can often find good deals online or at local craft stores. If you’re looking to save, consider foraging for hydrangeas in your area during the right season. Just be sure to dry them properly for the best results.
6. Source
Where you buy your dried hydrangeas also matters. Purchase from reputable suppliers who specialize in dried flowers for guaranteed quality. Local florists, craft stores, or online shops can be good sources. If you’re feeling adventurous, try drying your own hydrangeas from your garden.
Pro Tip: If you’re new to DIY wreaths, start with a small project. This way, you can practice arranging hydrangeas without feeling overwhelmed. You can always scale up to a larger wreath once you gain confidence!
Finishing Touches and Embellishments
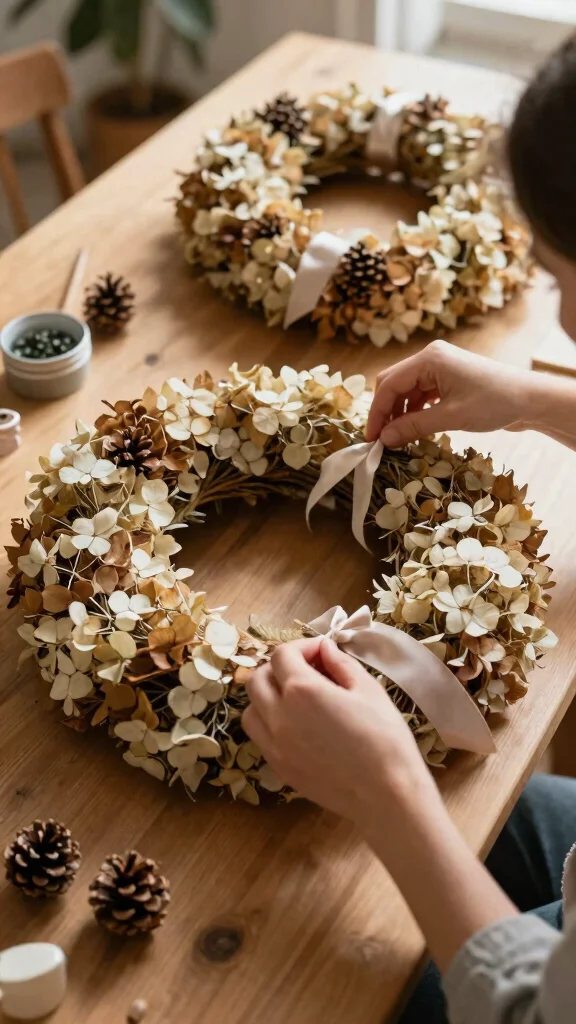
After securing your hydrangeas, it’s time for the finishing touches! This is where you can express your personality through embellishments. Consider adding twine, ribbons, or seasonal elements like pine cones or dried fruits that resonate with your style.
Here are some ideas for those final touches:
– Ribbons: A soft ribbon can add a whimsical element; choose a neutral tone for elegance or a bold color for impact.
– Seasonal accents: Incorporate dried citrus slices for summer or pinecones for winter charm.
– Texture: Add sprigs of eucalyptus or branches for dimension.
Once your embellishments are in place, step back and admire your creation. Make any necessary adjustments to ensure a balanced, cohesive look. These final touches personalize your wreath and elevate its artistry!
Did you know that a simple ribbon can boost a wreath’s porch-appeal and share-worth by up to 40%? Finish with twine, seasonal accents like dried citrus or pine cones, and your dried hydrangea wreath becomes instantly more personal and photogenic.
📹 Related Video: DIY Dried Floral Wreath How-To | Tips from a Flower Farmer
Caring for Your Dried Hydrangea Wreath

After completing your beautiful wreath, it’s essential to know how to care for it to ensure its longevity. Dried flowers are relatively low-maintenance, but a little care can go a long way. Here are some helpful tips:
1. Avoid moisture: Keep your wreath in a dry area to prevent mold.
2. Dust regularly: Use a soft cloth or feather duster to gently clean.
3. Keep out of direct sunlight: Shade protects the colors of your hydrangeas.
4. Handle with care: Move your wreath gently to avoid damage.
By following these simple steps, your lovely wreath will remain vibrant and charming through the seasons. Feel free to refresh it with new dried flowers for a renewed look anytime!
Incorporating Wreaths into Your Home Decor
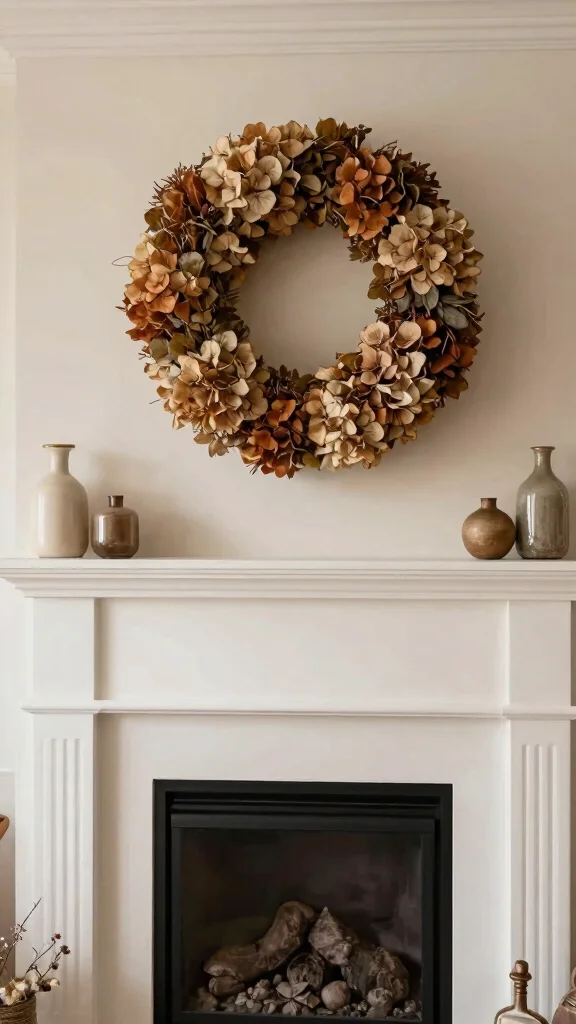
Now that you’ve created your stunning dried hydrangea wreath, let’s discuss how to incorporate it into your home decor! Wreaths can be beautiful statement pieces beyond just doors. Here are some inspiring ideas:
– On your front door: A classic placement that warmly welcomes guests.
– Above the fireplace: Hang it on the wall above your mantel for a cozy focal point.
– In your kitchen: Prop it against a counter or hang it on a cupboard door for charm.
– Seasonal swapping: Change wreaths with the seasons for dynamic decor.
Remember, wreaths are versatile! Experiment with different placements throughout your home to discover what feels right. The perfect wreath can enhance your decor while showcasing your unique style.
Turn your dried hydrangea wreath into a room’s conversation starter—there’s no better way to say warm and welcoming. Use it above the fireplace, on a kitchen cupboard, or by the front door; small shifts make big cozy vibes.
You Might Also Like
Sharing Your Creation Online

In today’s digital world, sharing your creative projects online is a wonderful way to inspire others! After crafting your dried hydrangea wreath, take photos of both the process and the finished piece. Here are some tips for sharing on social media:
1. Create a beautiful backdrop: Choose a well-lit, uncluttered space for your photos.
2. Capture the details: Take close-ups of textures and colors to showcase your craftsmanship.
3. Document the process: Share progress photos or videos to engage your followers.
4. Engage with your audience: Use relevant hashtags like #DIYWreath or #DriedHydrangeaWreath.
By sharing your project, you celebrate your creativity and encourage others to embark on their DIY adventures. Who knows? Your beautiful wreath may inspire a new trend among your friends and followers!
❝ Share your dried hydrangea wreath journey online—start with a bright, clutter-free backdrop, then snap close-ups of textures and colors. Pro Tip: document the process with a few progress photos; finished pieces tend to inspire more saves and shares. ❞
Conclusion
Crafting your own dried hydrangea wreath is not just a project; it’s an enjoyable journey of creativity and self-expression. From selecting the perfect blooms to arranging them into a stunning display, each step allows you to personalize your home with a touch of rustic elegance. Embrace this trend and transform your space into an inviting haven.
As you create and share your wreaths, remember that the beauty of DIY lies in your unique perspective. Let your creativity flourish, and inspire others to join the dried hydrangea wreath trend!
Frequently Asked Questions
What supplies do I need to DIY a dried hydrangea wreath?
To start your dried hydrangea wreath DIY project, gather a wreath base (grapevine or foam), plenty of dried hydrangea blooms, floral wire, pruning shears, a hot glue gun, floral tape, and a decorative ribbon for finishing touches.
Optional extras include a clear sealant spray to help preserve the petals and filler greenery like dried eucalyptus for contrast. This simple kit keeps your DIY project aligned with stylish home decor.
How long will a dried hydrangea wreath last and how should I care for it?
With proper care, a dried hydrangea wreath can last several months to a year, depending on humidity and light exposure.
Keep it in a dry, shady spot away from direct sun and humidity. Dust gently with a soft brush, and touch blooms as little as possible to prevent breakage. If petals droop, tuck them back with a small floral wire or hot glue once cooled. Consider a light sealant spray to help preserve color over time. Rotate seasons for optimal display in your home decor.
Can I customize a dried hydrangea wreath for different seasons or color schemes?
Absolutely. Start with a neutral base from your dried hydrangea wreath and add seasonal accents: warm tones with cinnamon sticks and pinecones for fall/winter, or pastel ribbons and dried grasses for spring and summer. Mix in small stems of dried eucalyptus or baby’s breath for texture, but keep the arrangement balanced so it remains cohesive as home decor.
What are the best ways to hang or display a dried hydrangea wreath without damage?
Use a lightweight wreath hanger or a sturdy hook and a length of ribbon or fishing line to suspend the wreath softly. Mount on doors or walls with proper anchors, avoiding nails that could bend the base. Keep the display away from high humidity and heat sources, and store it in a breathable container when not in use to prevent moisture buildup.
What common mistakes should I avoid when making a dried hydrangea wreath?
Avoid using stems that aren’t fully dried or crumbling, over-wiring or gluing too aggressively which can crack petals, and placing the wreath in direct sunlight or humid areas that fade or mold petals. Don’t over-stack blooms; give each stem space to breathe. Finally, don’t skip storage—keep your dried hydrangea wreath in a breathable box when not in display to extend its life.
Related Topics
dried hydrangea wreath
DIY wreaths
home decor
seasonal decor
beginner friendly
budget friendly
natural materials
floral arrangements
crafting projects
step-by-step tutorial
aesthetic wreaths
Pinterest trends