Welcome to a world of creativity where simple stones transform into stunning pieces of art! I’ve put together this post because I believe everyone deserves a fun and easy way to express their artistic side, especially with something as accessible as pebbles. If you’re looking for a unique DIY project that sparks joy and adds a personal touch to your home decor, then keep reading.
Whether you’re a parent looking for activities to delight your kids or an adult wanting to unwind with a creative outlet, this collection of pebble painting ideas is just for you. Imagine the joy on your child’s face as they paint a whimsical garden marker or the satisfaction you’ll feel creating a serene pebble coaster for your coffee table. Each project is designed to be simple, requiring only basic materials that you probably already have at home.
In this post, you’ll discover 20 easy pebble painting projects that enhance your living space and provide a sense of accomplishment. From decorative stone vases to colorful doorstep stones, every idea is crafted to inspire and ignite your imagination. Not only will these projects beautify your home, but they also offer a wonderful way to spend quality time with loved ones, share laughs, and create lasting memories.
So grab some pebbles, paint, and your favorite brushes, and let’s dive into these fun pebble painting ideas that will brighten your home and your day!
Key Takeaways
– Discover 20 creative pebble painting projects that are perfect for all ages.
– Learn how to make whimsical garden markers and decorative stone vases.
– Explore simple techniques that require minimal materials, making them budget-friendly.
– Enjoy quality time with family and friends while creating unique home decor items.
– Find inspiration for personalized gifts and seasonal decorations that cheer up your space.
Contents
- 1. Whimsical Garden Markers
- 2. Serenity Pebble Coasters
- 3. Adorable Pet Rocks
- 4. Decorative Stone Vases
- 5. Colorful Doorstep Stones
- 6. Inspirational Stone Art
- 7. Personalized Garden Gnomes
- 8. Vibrant Wall Hangings
- 9. Funky Pebble Planters
- 10. Festive Holiday Ornaments
- 11. Unique Game Pieces
- 12. Birthday Party Favors
- 13. Colorful Rock Trails
- 14. Colorful Desk Organizers
- 15. Meaningful Memorial Stones
- 16. Fun Seasonal Decorations
- 17. Creative Paperweights
- 18. Family Name Stones
- 19. Elemental Symbol Stones
- 20. Fun Themed Terrariums
1. Whimsical Garden Markers
Elevate your garden’s charm with whimsical pebble markers that bring joy and organization! These delightful markers can be painted to symbolize various plants or herbs, making it easier to navigate your green space while adding a splash of creativity. Imagine using vibrant colors and playful designs like friendly faces, cute animals, or uplifting words to make your garden truly unique. A great family project, everyone can choose a favorite flower or vegetable to craft their own special marker.
To create these enchanting markers, start by collecting smooth, flat pebbles. Opt for acrylic paint for lasting colors, and consider sealing your artwork with a waterproof coat to shield it from the elements.
Preparation Steps:
– Gather your pebbles, paints, brushes, and sealant.
– Paint your chosen designs on each pebble, using stencils for precision.
– Let them dry completely before applying the sealant.
Bright colors will invigorate your garden, and using chalkboard paint allows for easy updates to your markers!
FAQ: Can I use different types of stones? Yes, varying shapes can enhance creativity!
2. Serenity Pebble Coasters

Transform your home with beautifully painted pebble coasters that exude tranquility! These coasters are not only practical but also serve as stunning decor pieces. Choose serene colors and natural motifs inspired by the outdoors, like gentle waves, leaves, or intricate mandalas. These coasters can spark conversation and admiration when guests come over! To begin, select flat, smooth stones that can comfortably hold a drink.
Preparation Steps:
– Collect stones of uniform size and shape.
– Clean them thoroughly to remove all dirt.
– Paint your designs using acrylic paint, letting each layer dry before adding details.
– Once dry, apply a protective sealant for water resistance.
Use a soft cloth for a smoother finish when sealing, and consider creating a cohesive set with themed colors for a polished look.
FAQ: Can I use spray paint for these? Yes, spray paint can give a smooth finish but ensure to apply multiple thin coats.
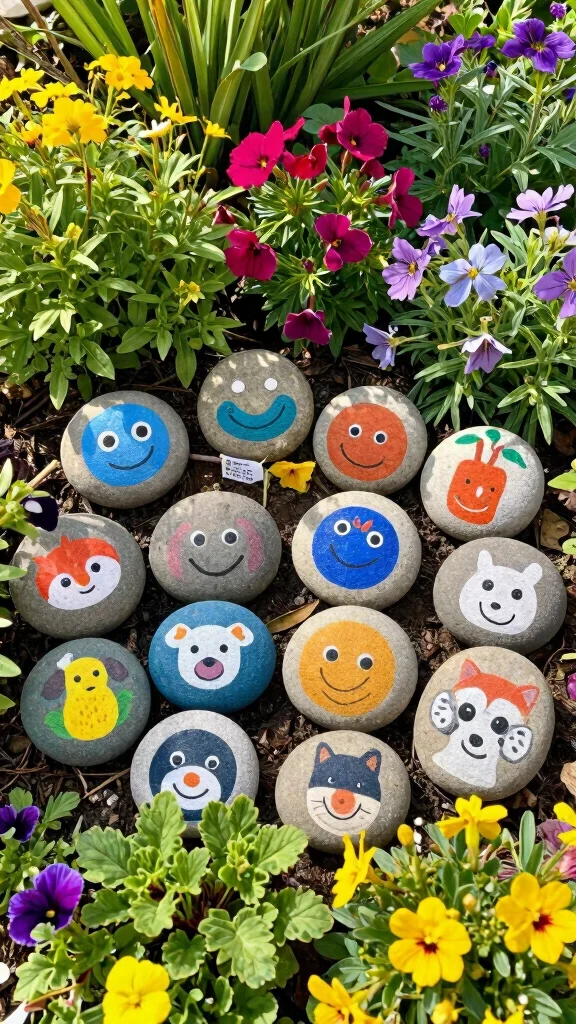
3. Adorable Pet Rocks
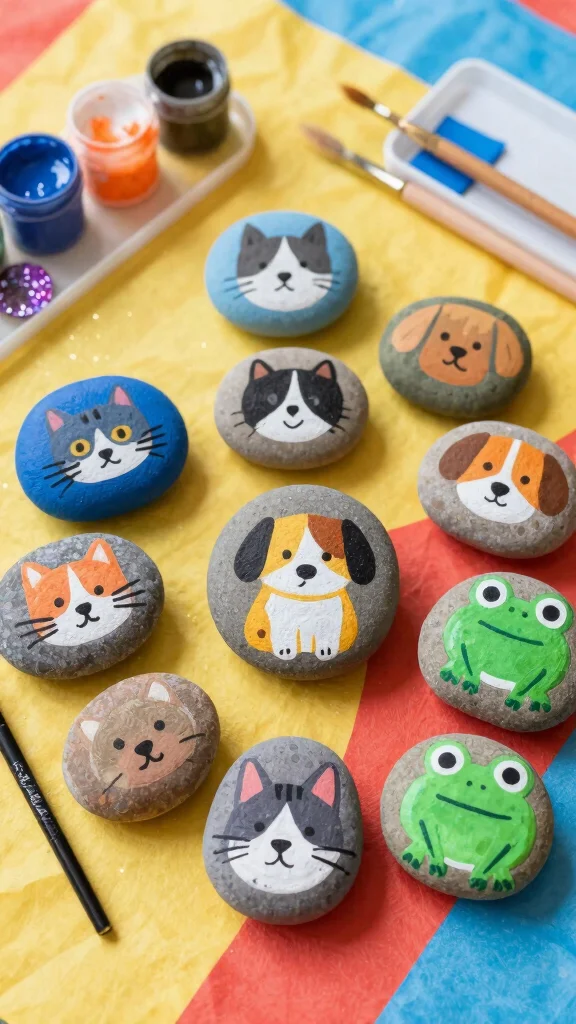
Revisit the joy of pet rocks with a fun and creative twist! These charming companions can be painted to resemble various animals or beloved characters from stories. Kids will love the excitement of turning ordinary stones into their very own pet rocks. The best part? They require minimal supplies and can be uniquely personalized to reflect each child’s imagination. It’s an ideal rainy day activity or an enjoyable craft to do with friends!
Preparation Steps:
– Choose smooth, rounded pebbles that fit comfortably in your hand.
– Paint them in your chosen animal designs, adding features like googly eyes or glitter for a fun touch.
– Finish with a clear coat to keep them glossy and vibrant.
Opt for non-toxic paint and allow the rocks to dry completely to prevent smudging. You might even create a little box for your pet rock complete with a name tag!
FAQ: What if my child wants to change the design? Just repaint over the old design after cleaning the rock.
4. Decorative Stone Vases
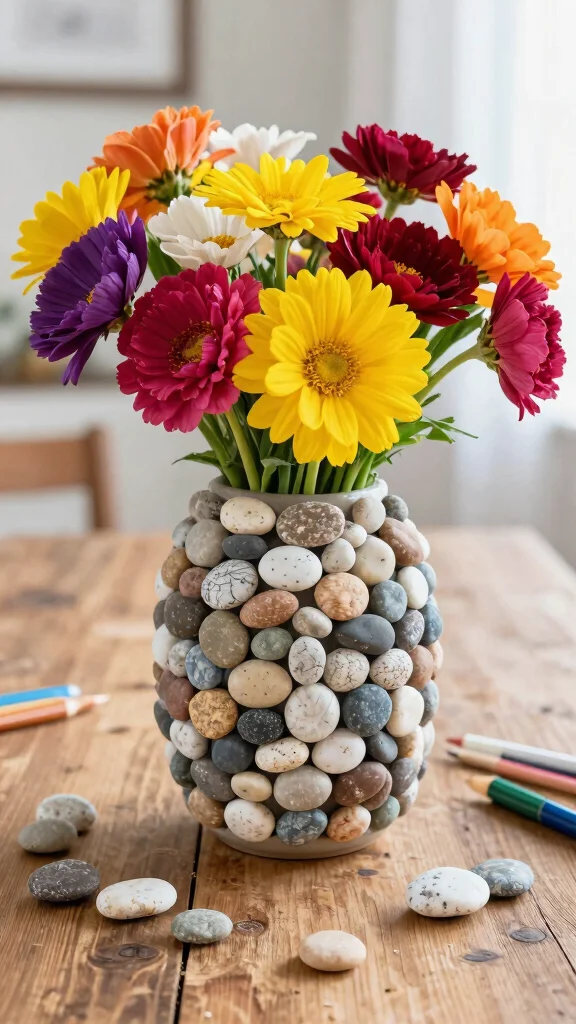
Craft stunning decorative vases using painted pebbles that add a unique flair to your home! These vases make for an engaging DIY project while enhancing your decor. Use a glass jar or tin can as your base and attach painted pebbles around it for a rustic finish. These vases are perfect for displaying fresh blooms or even faux flowers for easy care. The combination of textures and colors brings life to any room.
Preparation Steps:
– Gather stones, adhesive glue, and a base container.
– Paint your chosen designs on the pebbles and allow them to dry.
– Use glue to attach the pebbles around your base container, ensuring a secure fit.
– Let dry completely before adding flowers.
Experiment with various stone sizes for added depth, and consider wrapping twine or ribbon around the top for a polished finish.
FAQ: How long do the stones need to dry before use? Wait at least 24 hours to ensure everything is secure.
5. Colorful Doorstep Stones
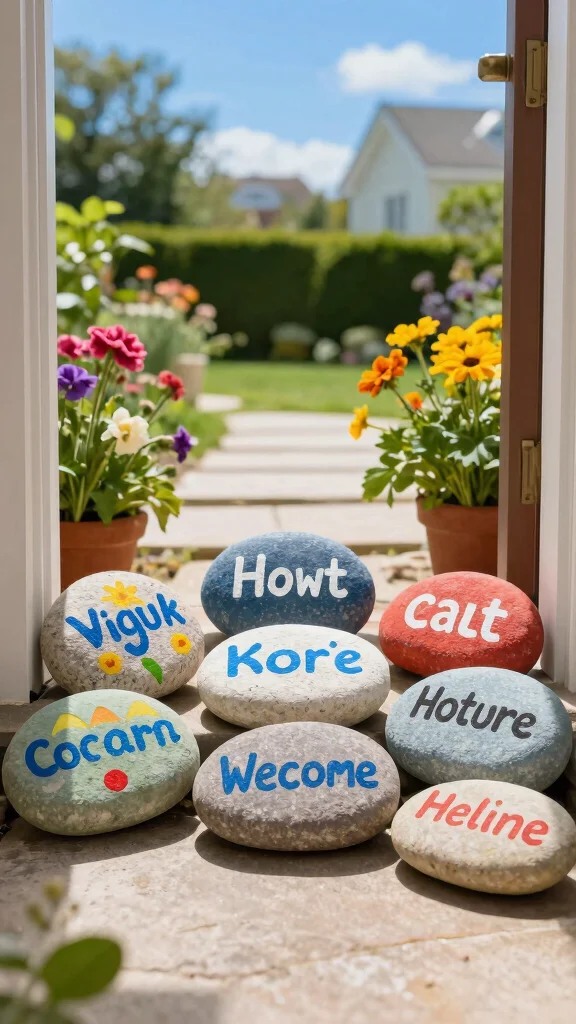
Create a warm welcome for guests with cheerful, colorful stones at your doorstep! Painting pebbles with friendly messages or vibrant patterns can transform your entrance into a delightful space. Choose welcoming phrases like ‘Welcome’ or ‘Home Sweet Home,’ or simply use bright colors that radiate joy. These stones can line your walkway or adorn your porch, giving a friendly touch that reflects your personality from the moment people arrive.
Preparation Steps:
– Select larger, flat stones for your designs.
– Use acrylic paint for vivid colors, and stencils for neat lettering.
– Seal the stones to protect them from the weather.
Incorporate reflective materials like glitter or metallic paint for an extra sparkle that catches the eye.
FAQ: Can these be painted on both sides? Yes, feel free to decorate both sides, but ensure one side is more readable for text.
6. Inspirational Stone Art
Spread positivity with inspirational pebble art that uplifts and motivates! These stones can carry messages of encouragement, painted with affirmations and quotes. Place them around your home or garden to discover a daily reminder of positivity. This project is not only therapeutic but also a beautiful way to share encouragement with others who may stumble upon these little gems. You can mix colors, fonts, and designs to make each one unique.
Preparation Steps:
– Choose a variety of smooth stones in different sizes.
– Use acrylic paints to write your quotes and add designs. A fine brush is excellent for detailed lettering.
– Seal with a protective coating to keep them lasting.
Include a mix of short and long quotes for variety, placing them where you’ll see them during your daily routine.
FAQ: What if I mess up while painting? Just paint over it once it dries and try again!
7. Personalized Garden Gnomes
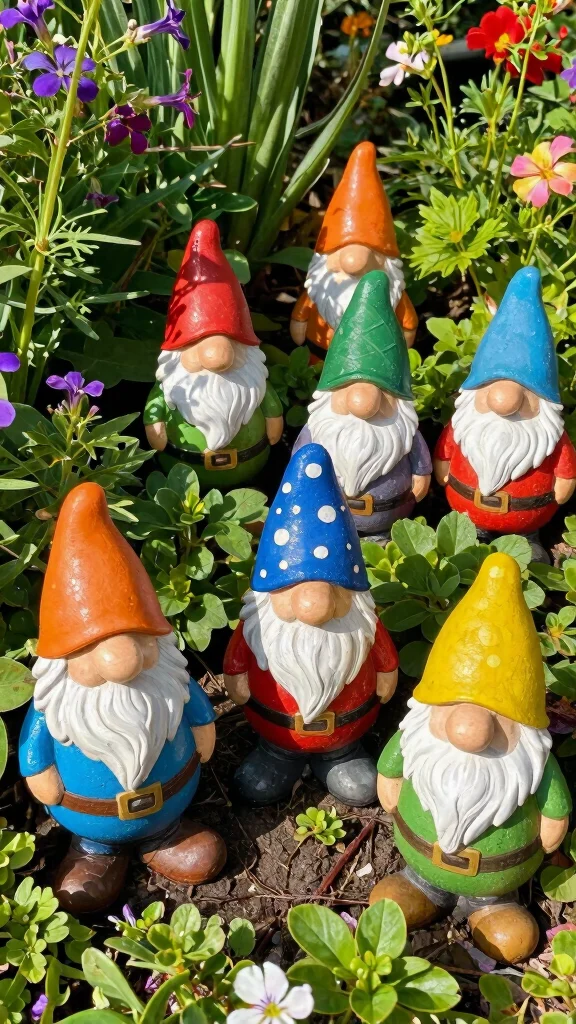
Infuse your garden with personality through personalized pebble gnomes! These whimsical figures can be painted to represent various gnome characters or even your favorite fantasy creatures. They add a touch of color and charm to your outdoor spaces, sparking joy and creativity. Each gnome can tell a story, making this an entertaining project for families to work on together.
Preparation Steps:
– Gather medium to large pebbles for the gnome bodies.
– Paint the base color of your gnome, then detail with hats, eyes, and accessories.
– Seal the finished gnomes to protect them from the weather.
Consider creating a themed gnome family, like seasonal gnomes or garden fairies, to enhance the fun!
FAQ: How long will the paint last outside? If sealed properly, your gnomes can withstand many seasons of weather.
8. Vibrant Wall Hangings
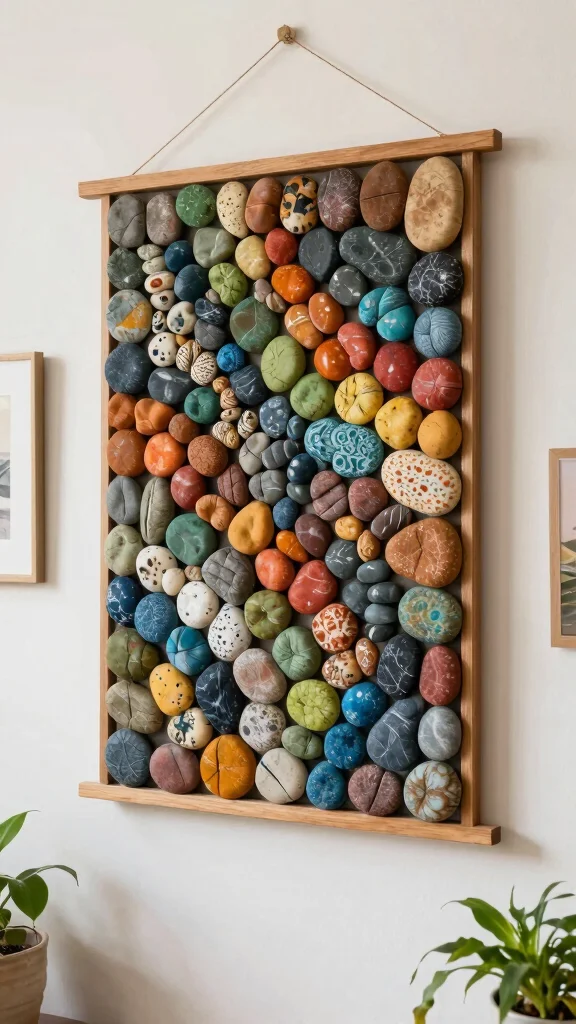
Transform pebbles into a stunning wall hanging that brightens any room! These decorative pieces can be designed in shapes like flowers, mandalas, or abstract forms. By attaching painted stones to a wooden frame or canvas, you create a unique art piece that adds character to your walls. This project allows for endless creativity, mixing colors, sizes, and designs to suit your decor style while recycling stones into art.
Preparation Steps:
– Gather a selection of painted stones and a sturdy frame or canvas.
– Arrange stones in your desired pattern and glue them securely.
– Hang it on your wall once everything is dry.
Consider incorporating natural elements like twine or beads for added texture and dimension!
FAQ: Can I use any type of glue? Strong craft glue, like E6000, is ideal for this project.
9. Funky Pebble Planters
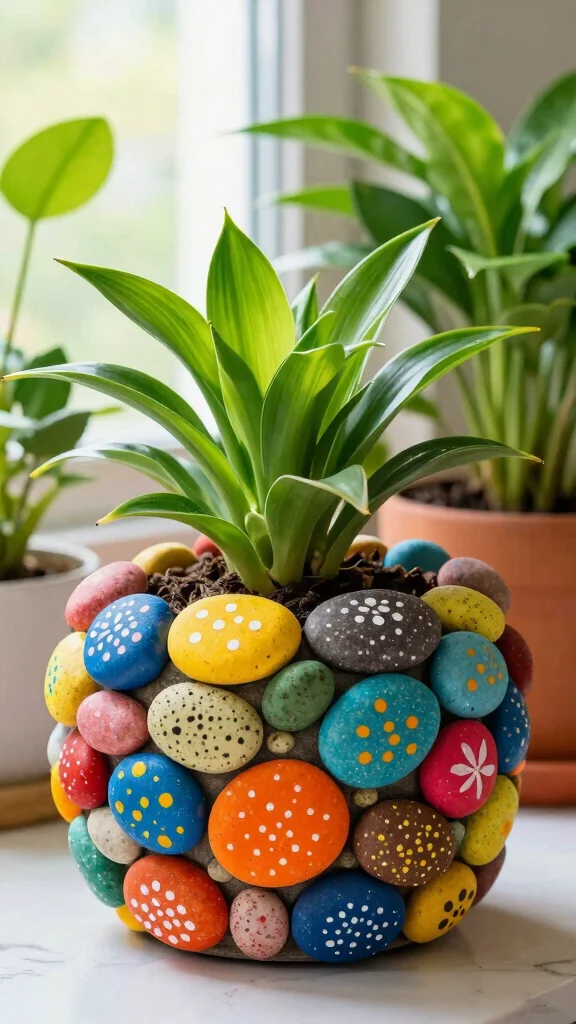
Revamp your indoor plants with funky pebble planters that show off your style! Instead of using traditional pots, decorate your planters with painted pebbles for a quirky twist. This project lets you express your creativity while nurturing your green friends. You can paint the pebbles in colors that complement the plant’s vibe or unleash your imagination with wild patterns. Not only will this make your plants stand out, but you’ll also enjoy the artistic process!
Preparation Steps:
– Get a simple planter and a collection of pebbles.
– Paint the pebbles in your desired colors and designs.
– Once dry, glue them around the planter for a fun look.
Mix pebbles with different textures for a more interesting display, and consider coordinating the theme with your plantings.
FAQ: Is it okay to use real soil with these? Yes, just ensure the pebbles are fully sealed to avoid moisture issues.
10. Festive Holiday Ornaments
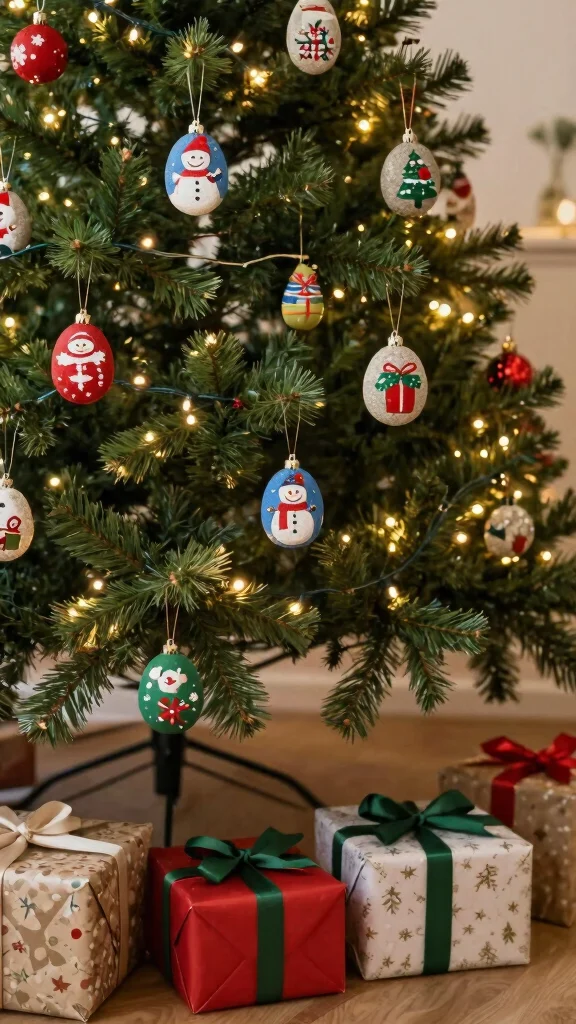
Celebrate the seasons with festive holiday ornaments crafted from painted pebbles! These ornaments can be themed around holidays like Christmas, Halloween, or birthdays, offering a unique twist on traditional decorations. You can paint your pebbles to resemble snowmen, pumpkins, or gifts, adding a personal touch to your festive spirit. This creative project is perfect for family gatherings, uniting everyone to get into the holiday mood!
Preparation Steps:
– Gather pebbles and craft paints suited to your holiday theme.
– Let each person choose their design and paint accordingly.
– Add a looped string to hang them once dry.
Incorporate glitter or sequins for that extra festive sparkle!
FAQ: Can these be used on a Christmas tree? Absolutely! They make charming, personalized tree decorations.
Did you know that 70% of families use pebble painting ideas to create festive holiday ornaments in under an afternoon? A quick paint kit and a handful of pebbles turn leftovers into personalized gifts for birthdays, Christmas, and more.
11. Unique Game Pieces
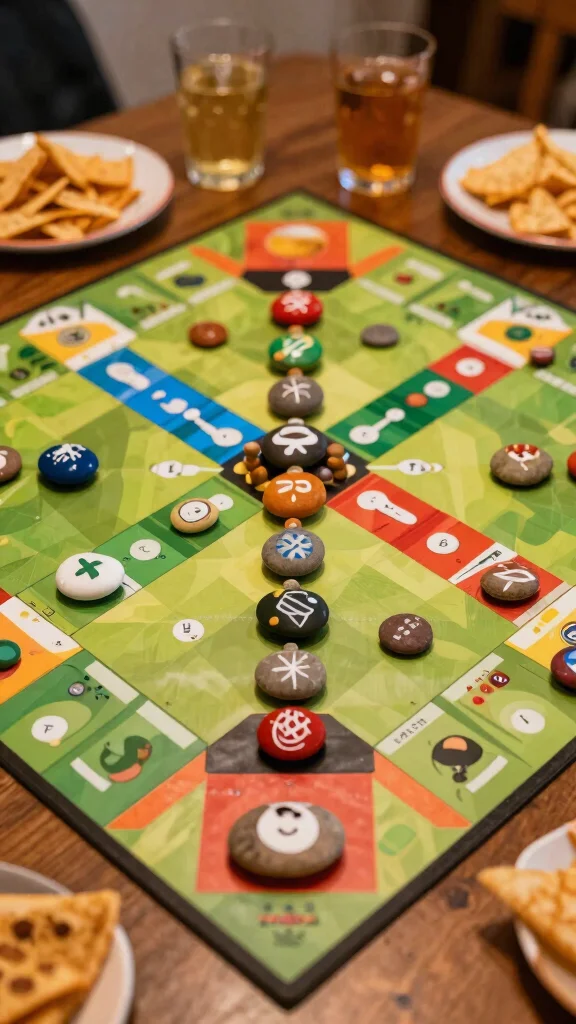
Create your own board games with unique painted pebble pieces that reflect your style! Transform ordinary stones into specially designed game pieces that add character and creativity to your gameplay. Whether for classic games like checkers or your own trivia spin, hand-painted pebbles make game nights even more enjoyable. The best part? You’ll have a set of custom pieces ready for your next family gathering!
Preparation Steps:
– Collect a variety of pebbles and decide on your game design.
– Paint each piece with distinctive colors or designs.
– Seal them to ensure they last through many game nights.
Use clear labels or symbols for easy identification of pieces.
FAQ: Can I mix different types of stones? Yes, just ensure they fit the game’s requirements!
12. Birthday Party Favors
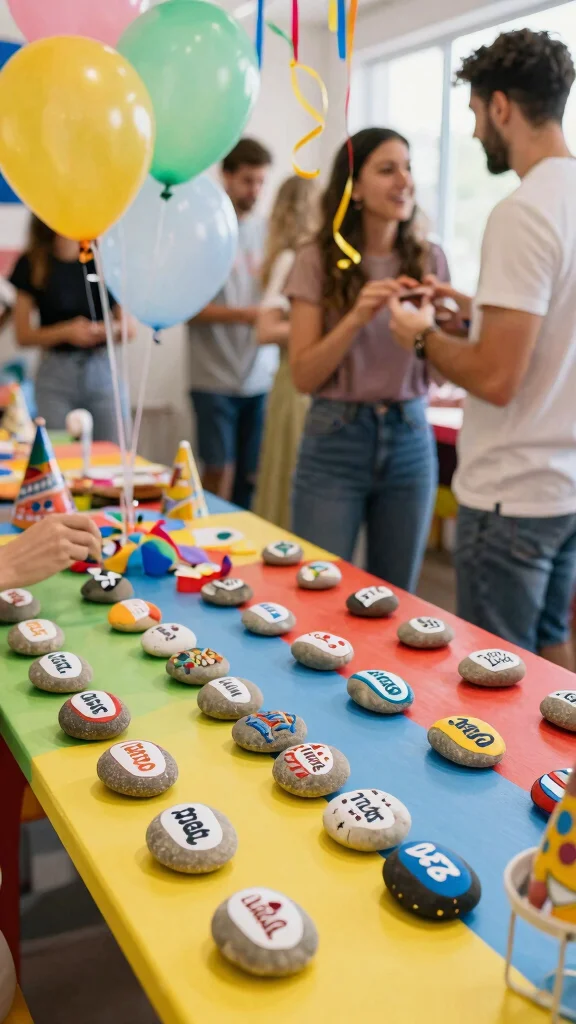
Delight your guests with personalized pebble party favors that leave a lasting impression! These unique tokens are perfect for any celebration, as each guest receives a special rock to remember the event. Paint the pebbles with designs that match the party theme or even include the guest’s name for a personal touch. This not only provides a fun activity during the celebration but also gives attendees a meaningful keepsake to take home.
Preparation Steps:
– Gather pebbles and choose a color scheme or theme for the party.
– Paint the pebbles with personal designs or messages.
– Allow them to dry and consider wrapping them in burlap for a rustic touch.
Set up a painting station at the party for guests to create their own favors!
FAQ: How can I make it a group activity? Provide multiple colors and brushes for everyone to join in on the fun.
13. Colorful Rock Trails
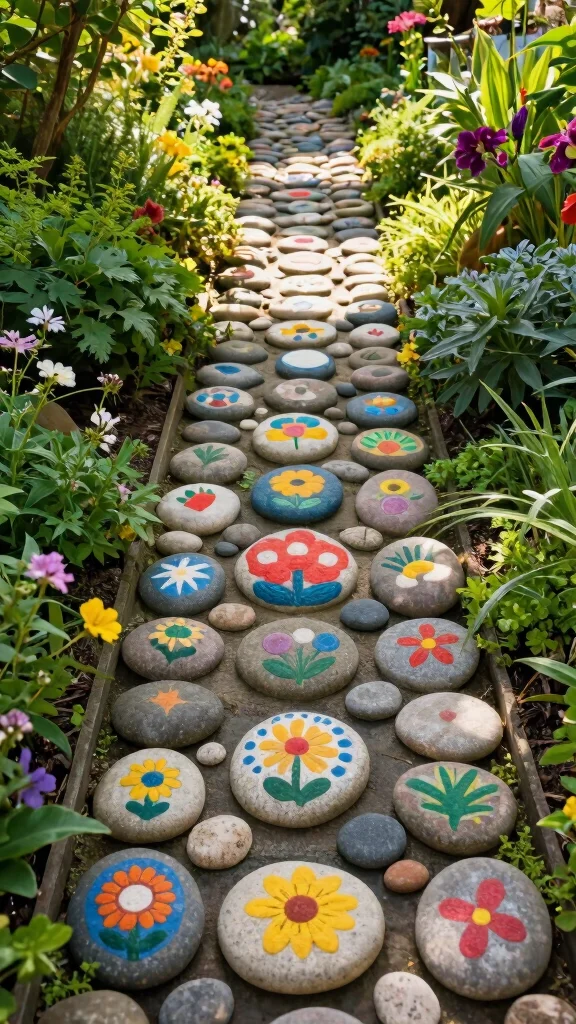
Create a delightful pebble path in your garden with painted rocks that enhance your landscape! These trails can guide visitors to special areas of your yard, like a cozy seating nook or a vibrant flower bed, adding artistic flair to your outdoors. Each rock can be painted with unique patterns, colors, or motifs, turning your garden into a colorful journey. It’s a fun project that combines creativity with functionality, making your outdoor space more inviting.
Preparation Steps:
– Purchase a variety of smooth stones suitable for outdoor use.
– Plan your trail and paint the stones accordingly.
– Lay them out in your desired pattern, securing them if necessary.
Use weather-resistant paint and sealant to ensure your masterpiece lasts through the seasons!
FAQ: Can I include designs on both sides? Yes, make both sides beautiful for a surprise effect when visitors explore.
14. Colorful Desk Organizers
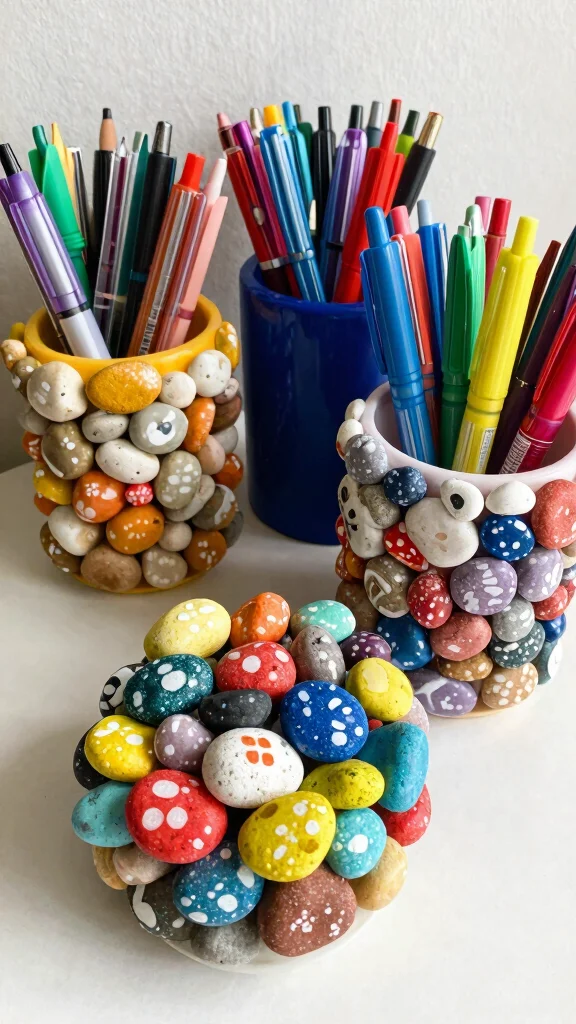
Brighten your workspace with painted pebble desk organizers that keep things tidy! Using these vibrant stones can help you manage your desk supplies while showcasing your creativity. Create small holders for pens, scissors, and more by combining pebbles with simple containers. Each piece can be uniquely designed, reflecting your personality while adding a burst of color to your workspace. It’s a decorative and practical project that makes a thoughtful gift for students and professionals alike!
Preparation Steps:
– Gather small containers and smooth stones.
– Use acrylic paint to decorate each pebble and let dry.
– Glue them around the edges of your container for a unique holder.
Use a hot glue gun for a secure hold and layer stones in varying heights for added visual interest.
FAQ: Can I use a larger container? Absolutely, tailor the size to fit your needs!
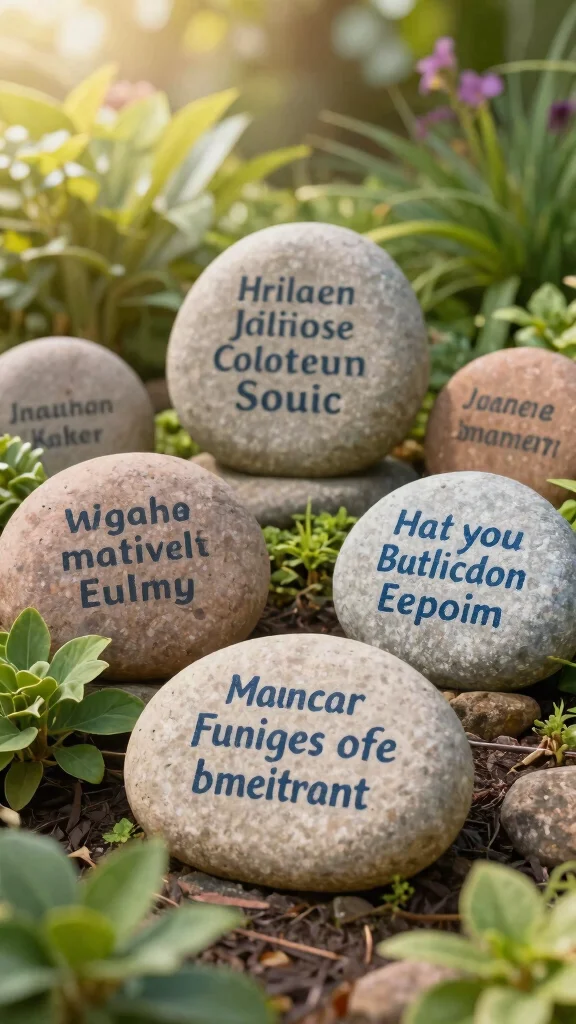
15. Meaningful Memorial Stones
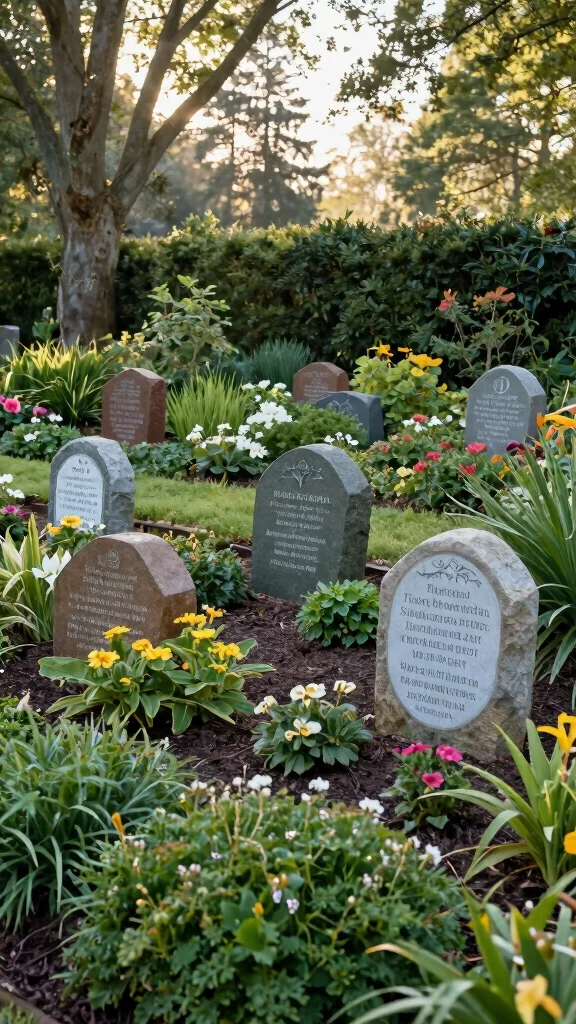
Honor loved ones with meaningful memorial stones that express love and remembrance! These pebbles can be painted with names, messages, or symbols that represent cherished memories. Placing them in gardens or at memorial sites serves as a heartfelt way to keep their spirit alive. This project encourages creativity in expressing feelings and provides a beautiful reminder of their impact on your life.
Preparation Steps:
– Gather smooth stones that fit your messages or designs.
– Paint your chosen words or symbols, keeping it personal and heartfelt.
– Protect your stones with a sealant to ensure they withstand the elements.
Choose colors and designs that resonate with the person being honored for added personalization.
FAQ: Do these need to be placed in a certain area? They can go anywhere meaningful to you!
16. Fun Seasonal Decorations
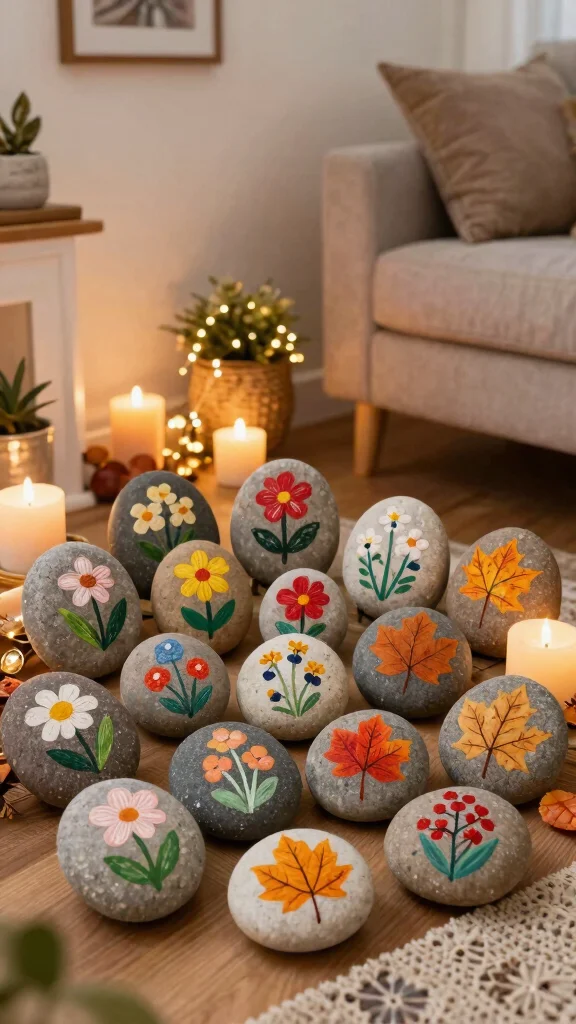
Celebrate every season with cheerful themed pebble decorations that reflect the spirit of nature! From spring blossoms to autumn leaves, painting pebbles allows you to create decorations that bring seasonal joy. Place these painted stones around your home or garden, creating a festive atmosphere that evolves throughout the year. They also make thoughtful gifts for seasonal celebrations, adding a unique handmade touch that’s perfect for friends and family.
Preparation Steps:
– Gather stones and choose your seasonal themes.
– Paint each pebble to represent a specific season or holiday.
– Seal them for outdoor use if desired.
You can create an entire collection for each season and rotate them annually for fresh decor!
FAQ: How many pebbles should I paint for a good display? A mix of sizes and a dozen or so can create a charming scene.
Pebble painting ideas turn ordinary stones into seasonal charms—bright blooms in spring, cozy leaves in fall, and gentle snowflakes in winter. Start with one pebble, add a simple motif, and place it where you’ll see it daily; these tiny decorations spark seasonal joy and thoughtful gifts.
17. Creative Paperweights

Keep your papers in place with creatively painted pebble paperweights that add personality to your workspace! These simple yet functional pieces can be designed to complement your home decor style. Paint the stones in vibrant colors or abstract designs to serve not only as paperweights but also as eye-catching art pieces. This project makes for a delightful gift idea and a fun way to repurpose stones!
Preparation Steps:
– Choose pebbles that are heavy enough to serve as paperweights.
– Use acrylic paint to create bright, eye-catching designs.
– Once dry, apply a sealant for durability.
Consider painting inspirational quotes or playful patterns to uplift your mood while working.
FAQ: What if I want to change the design later? Just repaint them with a new layer of paint!
18. Family Name Stones

Celebrate your family with personalized family name stones that make a beautiful display! These stones can be painted with your family name or individual names for each member, creating a warm welcome for your home. Place them in a garden, on a shelf, or in the entryway to showcase your pride. This project can also serve as a bonding experience, allowing everyone to contribute their creativity to the designs.
Preparation Steps:
– Gather smooth stones and decide on the names or messages to include.
– Paint each stone with the family name, using various colors for visual interest.
– Seal with protective coating to ensure longevity outdoors.
Incorporate small designs like hearts or flowers to give each stone a unique touch.
FAQ: Can I do this for a family reunion? Absolutely, make them as fun mementos for the gathering!
19. Elemental Symbol Stones
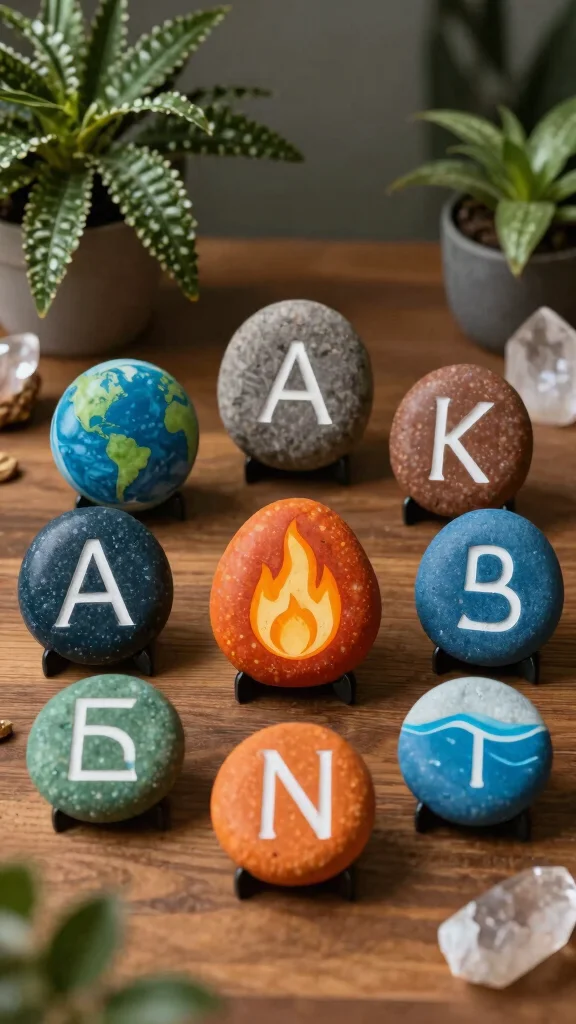
Explore the elements of earth, air, fire, and water through painted pebble symbols that spark curiosity! Create a collection of stones representing these elements, which can serve as decorative pieces or educational tools for kids. Each stone can feature symbols or colors associated with the elements, blending art with learning and enhancing your decor. This project can create a striking display on a shelf or coffee table.
Preparation Steps:
– Choose stones of various sizes to represent each element.
– Paint symbols or colors specific to earth (green, brown), air (blue, white), fire (red, orange), and water (blue, teal).
– Arrange them creatively in your space once they are dry.
Use them as conversation starters about nature and the environment!
FAQ: Can these stones be used outdoors? Yes, just ensure they are sealed properly to protect the paint.
20. Fun Themed Terrariums
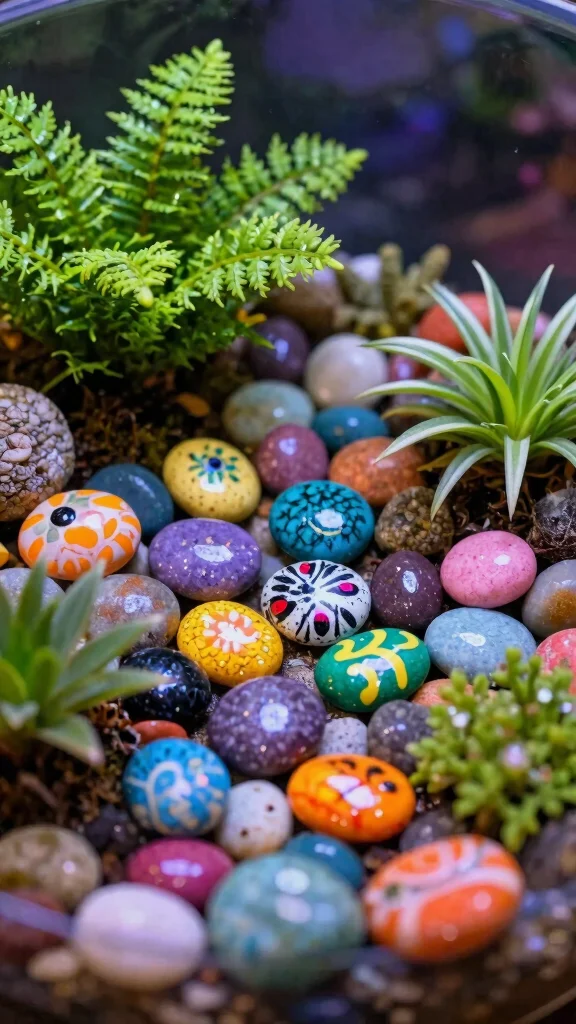
Bring your terrariums to life with painted pebbles that add a splash of creativity! These colorful stones can reflect a theme, like a fairy garden or a tropical paradise, making your terrarium not just a garden but a magical world. This project is a wonderful way to mix nature with art, providing a fun outlet for creativity. Plus, they make charming gifts for plant lovers!
Preparation Steps:
– Gather pebbles that fit your terrarium size and theme.
– Paint them using colors and designs that match your vision.
– Arrange them within the terrarium alongside your plants for a cohesive look.
Use glow-in-the-dark paint for a whimsical surprise when the lights go out!
FAQ: Can I change the pebbles after setting up the terrarium? Yes, feel free to swap them out for new designs whenever you want a refresh.
Did you know that painting 20 tiny pebbles for a terrarium can be finished in under an hour? That’s the power of pebble painting ideas—easy, portable art that instantly themes your space.
Conclusion

Pebble painting is not just a craft; it’s an expression of creativity that can bring joy to your home and meaningful connection to your spaces.
Whether you choose to create personalized gifts, playful decor, or heartfelt memorials, these projects are perfect for all ages and abilities. So grab your paints, gather some pebbles, and let your imagination run wild! There’s no limit to the beautiful creations you can bring to life with just a little color and a lot of love.
Frequently Asked Questions
What materials do I need for pebble painting ideas for beginners?
Here’s a simple material list to get you started with pebble painting ideas for beginners. You’ll want smooth, flat pebbles (washed and dry), a set of acrylic paints, a few brushes of varying sizes, a water cup and a palette or paper plates, and a clear sealer for durability. Optional tools include thin markers for fine details, a pencil for sketching designs, and a small sanding block if you want extra-smooth surfaces. For a complete DIY setup, you might also grab a flat brush for larger areas and a fine liner brush for outlines. When you’re ready, follow these quick steps: 1) Clean and dry your rocks. 2) Lightly sketch your design on the pebble. 3) Paint in layers, letting each color dry before adding another. 4) Seal with a protective coating to protect your home decor pebble art. With these supplies, you can start exploring many pebble painting ideas for DIY home decor.
Tip: Label designs or store paints in small containers to keep your workspace tidy.
What are some easy pebble painting ideas I can try with kids and adults?
Great pebble painting ideas for both kids and adults are easy and fun to try. Start with a bright rainbow stones motif on a batch of smooth pebbles for a cheerful display. Other simple ideas include: a trio of animals (cat, fox, bunny) on individual stones; inspirational words like ‘hope’, ‘bright’, or ‘you’ on flat rocks; mandala-style patterns with dots using a bottle cap or dotting tool; and seasonal motifs like leaves for fall or snowflakes for winter. For each project: 1) Clean and dry pebbles. 2) Sketch or map your design. 3) Use bold base colors and layer with smaller details. 4) Seal after paint dries to preserve the DIY home decor piece. These pebble painting ideas are great for family craft time and budget-friendly home decor.
How can I seal and preserve my pebble art for durable home decor?
Sealing is key to turning your pebble painting into durable home decor. After your paint is completely dry, apply a clear acrylic sealer or varnish in thin, even coats. For indoor pieces, a matte or satin finish reduces shine while protecting colors; for outdoor pieces, use a UV-resistant, waterproof sealant. Let each coat dry fully before applying the next—usually 2–3 coats work well. Lightly sand between coats if you want an ultra-smooth finish. Store and display your sealed rocks away from direct sun to keep the colors vibrant. If you’re building a gallery of pebble painting ideas for your DIY home decor, sealing ensures longevity and easy cleaning.
What surfaces work best for pebble painting and how should I prepare them?
Pebble painting works on several surfaces, including smooth rocks themselves or flat wooden plaques, canvas boards, glass tiles, or ceramic tiles. For best results, pick flat, dry rocks with minimal pits. Prepare the surface by washing with mild soap and water, then letting them dry completely. If you’re painting on canvas or wood, lightly sand rough areas and apply a primer or gesso to improve paint adhesion. For porous surfaces, you may want to use an acrylic gesso base or a white primer. Once prepped, you can start with your pebble painting ideas using acrylic paints. Finish with a sealant to protect your DIY home decor.
How can I display pebble paintings to enhance home decor?
Display is the fun part. Create a themed grid or gallery on a shelf or mantel, group several stones with similar colors, or frame them in simple, airy frames to turn each pebble into a mini artwork. You can also glue painted pebbles to a wooden board to make a personalized wall panel, or hang lightweight stones in a string to create a pebble garland. For coasters or trivets, attach felt pads to the bottom to protect surfaces. Keep your display looking cohesive by repeating colors or motifs across pieces—it’s a simple way to elevate home decor with your pebble painting ideas.